Sunday, 28 November 2021

Mushroom log

We now have a brand new mushroom log. It was an early Christmas present. It was meant to be a normally timed Christmas present, but when my husband opened the package to check the instructions, it said we had to plant it out as soon as possible, so here it is. When I say plant it out, I actually mean bury it 15-20 cm deep in the ground so that it stands upright. The main purpose of this is for it to have the appropriate temperature and light levels. The mushrooms use the log rather than the soil to grow. The log's supposed to go in dappled shade, so I put it just behind my apple tree. It should take at least a year for any mushrooms to grow, but I'm looking forward to what they're going to look like as much as eating them. I think it makes a fine addition to my fernery.

I got the log from rusticmushrooms.co.uk. It's already been inoculated with mushroom spawn – in our case of oyster mushrooms. It was a nice simple way to grow mushrooms on a log, as it means we didn't have to source a log separately. But in case that's easy for you or you can't get hold of a pre-inoculated log, you can also buy spawn plugs and inoculate a log with them yourself. Here's some information on how to do that and what sort of logs work best.

I've left as many plants and seed-heads in the garden as possible this year, so that it doesn't just look bare over winter. Also, our local wildlife really appreciated the seed heads of my sunflowers. The birds peck at them, and we even watched a squirrel nibble through a stalk then run off with an entire head. 

You've got to catch the beauty of the colder months where you can. And a little earlier in autumn, I was delighted to see some spiders had made their own rather lovely, albeit temporary addition to our bonsai trees:

Saturday, 11 September 2021

Quick three-veg macaroni cheese


 This macaroni cheese is healthier than most because of the three types of veg in it. You can leave the spam out for a vegetarian version, but, sadly, it doesn't taste as good. You can also put fried bacon lardons or fried chopped bacon in instead of the spam. That tastes just as good, but the spam is a much easier option and surprisingly tasty. It's worth adding an extra 30 ml of milk if planning to serve it on more than one day, as it does dry out a bit when it cools. It will make it looser than ideal on the first day, but just as delicious, and a better consistency for the later days. We find it lasts 2 days in the fridge (it might actually last longer, but we've never tried).

Serves 6, takes about 30 minutes

400 g macaroni

400 g broccoli florets (frozen)

2 tbsp olive oil

2 onions, finely chopped

340 g spam, chopped into small cubes (about 0.5 to1 cm) (optional)

2 tbsp plain flour

250 g soft cheese (e.g. Philadelphia - you can get away with just a 200 g tub of Lactofree soft cheese)

350 ml milk 

340-400 g tinned sweet corn, drained

50 g cheddar, grated (we use extra mature)

40 g breadcrumbs 

1 tbsp of chopped parsley (optionally frozen)

salt and pepper


1. Preheat the grill to high. Cook the macaroni following pack instructions. Add in the broccoli for the last 5 minutes. Drain when done.

2. Meanwhile, heat the oil in a (very) large frying pan. Peel and finely chop the onions, then cook the onion for 5-10 minutes.

3. While the onions are cooking, chop the spam into cubes of about 0.5 to 1 cm across and add to the onions.

4. Also while the onions are booking, once you have drained the macaroni and broccoli, pick any big pieces of cooked broccoli out of it and chop it into bite-sized pieces.

5. Once the onions are soft, stir in the flour, then add the soft cheese, milk, sweet corn, cooked macaroni and cooked (and now bite-sized) broccoli.

6. Season with salt and pepper and stir gently for about three minutes.

7. Pour the macaroni cheese mixture into a large lasagne dish.

8. Sprinkle the breadcrumbs and parsley evenly over the top. Grate the cheddar and sprinkle that over too.

9. Cook under the grill for five minutes until golden and bubbling. Optionally serve with lettuce and tomatoes for even more veg.

Saturday, 4 September 2021

Sautéed apples and pork with mustard sauce


This serves four and takes about 30-40 minutes to make. It's good with mash. I recommend peeling the potatoes and peeling/chopping any veg you're having with it before you start, as once you do start, there's not a lot of spare time. I particularly recommend green beans or cabbage. Carrots are also nice with this.


4 tbsp plain flour

1/2 tsp salt

1/4 tsp black pepper

4 lean, boneless pork steaks (the original recipe recommended they be 85 g each, but larger is also fine)

3 tbsp (= 60 g) of butter

2 Golden Delicious or Jonagold apples (don't use red or green apples; it doesn't taste right)

1 small onion (minced)

250 ml apple juice

125 ml dry white wine

125 ml plain yoghurt (optionally low fat)

2 tbsp Dijon mustard

1/4 tsp dried thyme leaves


1. If you are having mash with this, peel the potatoes, chop them, and put them on to boil for 20 minutes (once they are done, drain them and return them to the pan, and put the lid on to keep warm). Also, peel and chop any vegetables you are having with this that need peeling and chopping, but don't cook them yet.

2. Meanwhile, in a pie plate or shallow dish, combine 3 tbsp of the flour with the 1/4 teaspoon of salt and 1/4 teaspoon of pepper. Dredge the pork steaks in the flour mixture to coat all sides lightly.

3. In a large frying pan, heat 2 tbsp (= 40 g) of the butter and the 2 tbsp oil over a medium heat. Add the pork and cook until fully cooked, i.e. brown on both sides and the juices run clear. This should take about 4-8 minutes per side, depending on the size of the steak and the heat.

4. While the steaks are cooking, peel and mince the onion (i.e. chop it really finely). Also, make the yoghurt mixture in a jug or bowl by combining:

  • the 125 ml yoghurt
  • the 2 tbsp Dijon mustard
  • the 1/4 tsp dried thyme
  • the remaining tbsp flour
  • 1/4 tsp salt
5. Once the pork steaks are cooked, remove them to a plate (ideally a warmed one), then add the remaining tablespoon (20 g) of butter to the frying pan. Peel, core and slice the apples. Add the apple slices and the minced onions to the frying pan and sauté until both are tender (about 5 minutes). Remove to the plate with the pork.

6. Add the apple juice and wine to the frying pan and simmer for 5 minutes. This is a good time to mash your potatoes (put the lid back on afterwards to keep them warm) and boil water ready for your veg. 

7. This is the time to put any vegetables you are serving on to boil or steam for the appropriate length of time. Then stir the yoghurt mixture into the apple juice and wine in the frying pan. Simmer and stir for 4-5 minutes. Return the pork steaks, apple and onion back to the frying pan for a minute or two to make sure they are warm.

8. Once your veg is ready, serve with your mash and veg.

Lunch party in the garden


On the Sunday before the August bank holiday, four members of Curry Club (a club named after the first meal it ate together rather than any intention for the content of future meals) met together in my garden for the club's second meeting. Earlier meetings had been planned, but Covid got in the way. Then again, if it weren't for Covid, the meeting would probably have been indoors in the evening and not in the vegetable garden for lunch, and I'm very glad we did have it in the garden.

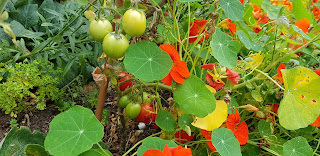
Did I remember this blog and take photos for it? I absolutely did not. I was far too busy with cooking, refilling glasses, listening to the stories of the other three members who came and telling my own. However, slightly less than a week later, I have taken some photos to capture the joy of the garden when Curry Club met. Like today, it was a largely cloudy day, but fortunately most of the flowers that grew in my garden this year (a mixture of self-seeded and sown by me) were bright oranges and yellows, bursting through the cloudiness of the day. In fact, my snails' choice of demolishing my veg and leaving largely flowers made the garden much prettier than it has been in previous years.


I even managed to serve two things from the garden: tomatoes in bruschetta and runner beans as an accompaniment to the pork steaks I served with sauteed apple and Dijon mustard and yogurt sauce. It is a delicious recipe and I can no longer find it online, so I have written it out in my next post.

I would have included raspberries in the meal as well, but at Curry Club, someone else brings the dessert, so no raspberries this time. I may sneak them into a dessert I bring to someone else's meeting. I'm currently harvesting probably around 100 g or more each day and slowly filling my freezer.
My other half's lockdown hobby came up as a talking point at the lunch. He's been making mosaics for paving stones for the back garden:


They are all based on Roman designs, with a few variations to the original design in colour, size and material (the Romans did not have Winckelmans cermaic tiles).

We drank prosecco and I also served Apfelschorle. Apfelschorle (pronounced ap-fell-shore-luh) is a German name for a drink that is half apple juice and half sparkling water. We don't have a name for it in English, which is a shame, as it means we don't tend to drink it either.

We ate in the middle of the grass, which I left long, as I like it a bit wild and shaggy and curling round your feet. In fact, the whole garden looks a bit wild. But that's exactly how I like it.

Sunday, 11 July 2021

Sparrows love string

The sparrows in my garden have been pulling bits off the string I tied up the bean poles with. I think they've been using it in their nests. This video is from June:


Fruit and veg that can survive slugs and snails


I have a major slug and snail problem in my garden, to the extent that if plants can survive my garden, fundamentally they can survive slugs and snails. I have had such a bad year for slug damage that I've barely been able to grow any brassicas or root veg at all. Currently I have a few surviving kale plants (mainly in copper slug rings), plenty of rocket (when I can get it to grow at all it survives them fine). and a few surviving chard plants. Slugs and snails have chomped their way through everything else (or at least, I'm assuming they're the guilty party, certainly my seedlings vanished). But I'm pleased to say that my rhubarb is surviving fine. I took the slug ring off when it was still pretty new to the garden, and although it does have holes in its leaves, it's grown well and is looking strong, with no damage to the stems. 

In other triumphs, the sweetcorn is also doing fine, although none of the corn I planted directly in the ground has survived. I think the slugs probably got it when it was still tiny. I learnt from Gardeners' World this week that the further apart you plant sweetcorn, the more cobs it will produce per plant. If I'd known then what I know now, I would simply have put the plants further apart.
My tomatoes were also a pleasant surprise. I haven't had much time for gardening this year, but when I went out and looked at them, a lot had grown quite big. It just wasn't initially visible until I staked them. Some even had green tomatoes growing on them. They do have some slug damage, but they are surviving well overall.

My broad beans, on the other hand, have been an unmitigated disaster. They ended up getting black fly, then they got rust, then – rust obviously being tasty to slugs and snails – they got devoured by slugs and snails, all before I could get any crop. I'll be lucky to get as many as 4 pods of beans from them this year. It hasn't been so bad in previous years, but this year, growing amidst my wild flowers, they've done appallingly.
They do not grow well with plants that can harbour snails. Some of my beans are doing OK though, despite sharing with other plants. The ones that didn't meet a snail-y death even went so far as to strangle some of my other plants.
The raspberries are also doing well - despite also getting some rust. They never get snail damage. The squashes only just survived though. If I hadn't put them in slug rings and gone on slug patrol to get as many slugs and snails as possible, they'd be dead - as would the two surviving sunflowers of the 15 I planted.
On the plus side though, the garden does look pretty and is bursting with wildlife (albeit with rather more slugs and snails than I'd like).


Sunday, 13 June 2021

Flowers and slugs outcompeting the veg

We have so many slugs and snails that every year is a difficult year for slugs and snails for me. This year is no different, but somehow, despite COVID, I've had less time for the garden than usual this year, so it feels more like the slugs and snails are doing more damage and that I'm fighting more of a losing battle.

I didn't originally put slug rings around my squashes, as they were so big they wouldn't have fitted inside. But the slugs soon saw to that, and I put rings round the surviving ones to preserve what was left!

My decision to have more flowers around the veg may have been a contributing factor, as they give the slugs ad snails  more places to hide. In particular, I am a little worried for my beans, which I planted around the flowers instead of taking out the flowers I had grown from seed either before they flowered or before I out the beans in. The flowers grew much taller than I had expected, and I clearly hadn't paid much attention to the seeds in my mix, as I was surprised to discover myself growing both borage and cornflowers and also by how tall the cornflowers got. Time will tell whether the runner beans survive this. Other beans have been eaten back to the stem by greedy snails, but the runner beans seem to be hanging on in there, and I hope that when they grow taller than the flowers they will do well.

My broad beans seem to be faring better. They have more been planted alongside the flowers than in among them. However, the black fly have finally arrived, along with a bit of rust, so they're not doing any better than they do in other years.
The climbing roses at the bottom of my garden are looking glorious. They remind me of a bride in all their white finery, and I have taken to thinking of them as "the bride", despite the fact that they are actually two plants. They don't compete with anything, as there's too much shade at ground level to grow any vegetables down there.
My rhubarb is flourishing. Sure, it's got slug damage (the leaves are clearly only poisonous to humans), but considering it dropped every single one of the leaves and stalks it came with, the current number of leaves is very reassuring for me, even if they are a bit slug-battered.


Saturday, 22 May 2021

Wildflowers in the vegetable garden and No Mow May

 My vegetable garden this year has been even wilder and freer than in previous years (despite my laid-back approach to weeding). This year, I positively sowed a wildflower seed mix and left those of the self-seeded flowers I like the most growing where they planted themselves.

As a result, my legume (beans/peas) and cucurbit (this year just squash) beds are full of flowers. I'm not sure if it's because of this or all the rain we've had this May or the dry April or just dumb luck, but for whatever reason, my broad beans, which I fitted in at the end of the bed, barely have any black fly yet. Normally, by this time of year they're absolutely covered in them. So they're much healthier than they usually are, which is a real bonus. 
I am, however, left with a bit of a conundrum: do I need to remove some of my flowers to plant my beans (some of which I started in the greenhouse, others of which I was given by a neighbour), or can I just get away with fitting them  in between the flowers? I'm going to try the latter approach, although I'm going to go on slug patrol first, as I've noticed that every single one of my brassica seedlings (radishes and turnips have been devoured by slugs and snails so that barely a trace is left. If I hadn't seen them appear with my own eyes, I'd just have thought I had dud seeds. 
All the seedlings you can see in the picture are self-seeded nasturtiums. I still don't know what happened to the root veg I planted - dud seeds or slugs. There are, at any rate, a lot of slugs and snails at large in my garden at the moment, possibly due to all the rain. Luckily, they seem not to be interested in my mangetout, so those at least have survived.
I've also been doing No Mow May. Despite all the rain, the grass hasn't actually grown that much yet, except at the edges, so mainly it just looks a bit messy. It's possibly not the best month for it, as I mainly have daisies coming up at the moment, whereas my lawn is much more diverse later in the year with clover and speedwell and buttercups (and you get to see a lot of those flowers, as fortnightly is the most it ever gets mowed).

Sunday, 9 May 2021

Lemon chili crumble cake (Streuselkuchen)

This is another German cake recipe from Dr Oetker that I've adapted to make with ingredients available in the UK. The original is available in German on https://www.oetker.de/rezepte/r/zitronen-chili-streuselkuchen. My cake tasted better on the second day than the first, possibly because I hadn't left it to cool for long enough before eating the first slice.

It makes about 12 generous pieces or 16 smaller ones, and you will need a 26 cm springform cake tin to make it in.

Crumble ingredients:

½ - 1 small red chili pepper (if you use one that is too mild, you won't notice it at all)

300 g spelt flour

60 g brown sugar (the original uses vanilla sugar, so feel free to use vanilla sugar (i.e. sugar that's been sitting with a vanilla pod in it) here)

Peel of 1 -2  lemons

150 g soft butter or margarine (plus a little extra for greasing)

100 g chopped almonds

Filling ingredients:

250 g apples (about 2 to 2 1/2) - I used golden delicious 

500 g quark (ideally 40% fat, but actually any you can get)

200 g sour cream (highest fat available)

80 g brown sugar

37 g custard powder

3 medium eggs

1. Grease the 26 cm springform cake tin. Preheat the oven to about 170 °C/fan 150 °C.

2. To make the crumble, clean the chili pepper of seeds and chop very finely (it's advisable to wear rubber gloves to do this). 

3. Place the spelt flour in a mixing bowl and add the remaining crumble ingredients. Using a mixer (pastry hook or similar), mix on low speed until crumbles form. (If you haven't left the butter out of the fridge long enough for it to go soft, you either need to wait until it does or rub it into the flour like you would for pastry first, before adding the other ingredients)


4. Spread a good half of the crumble on the bottom of the springform cake tin and press down. 

5. Place the tin on a rack in the bottom third of the oven and bake for around 15 minutes.

6. Put the tin with the pre-baked base on a cake rack and allow to cool.

7. Press a good half of the remaining crumble mixture into the springform cake tin to form a 3 cm high rim.

8. Other than the apples, put all the the remaining filling ingredients in a bowl and mix well.

9. Wash the apples, core them and optionally peel them (I did, but the original recipe mentions neither peeling nor coring). Cut them into small cubes and spread these on the base.

10. Pour over the filling mix, then sprinkle the remaining crumble on top. 

11. Put the cake into the bottom third of the oven and bake for about 50 minutes.

12. Loosen and remove the sides of the springform cake tin. Let the cake cool on the bottom of the tin on a cake rack for at least 2 hours.

Sunday, 25 April 2021

Supporting autumn fruiting raspberries

Autumn fruiting raspberries are great. You just chop them down in ground level in February and they grow again, giving you lots of lovely fruit year after year (in my case in late July and August) with very little further effort. You don't even need to support them. But, if like me, you are growing them right next to a path and/or the doors to the greenhouse and/or shed, you might want to, as otherwise they do tend to scratch at you as you walk past.

In previous years, we have used bamboo canes with string tied around them to try and keep the raspberries in. But the raspberry canes have proven stronger than the canes. So what we've now done is buy wooden stakes. The wooden stakes were approximately 180 cm long with pointed tips, so we could bash them more easily into the ground.

We used a mallet to drive them about 30 cm into the ground and then tied string around them at three heights to keep the raspberries in. We actually did it while the raspberries were almost ready to fruit, but doing it before they grow is probably more sensible.
Here's a picture from last year:

You'll notice that since last year, we've also added some paving slabs to make a path. These are not concreted in. We just removed patches of lawn to make them level with the grass. This is fine for us, as their weight keeps them in place, but if you have anyone or anything come into your garden that might injure themselves on unsecured slabs, you're probably better off concreting them in.

Here's a picture of the garden as it is today. You'll notice that I've already got my first bamboo canes in one of the beds. They're for mangetout. And behind them I have broad beans growing. My beds are a bit messier this year, as I'm growing flowers in them before I put some of the veg in, and not all the mixed seeds I scattered have grown, leaving a rather patchy impression in the beds. However, the bees will appreciate any flowers I grow at all, and the sparrows also appreciate them. I've seen them devouring large chunks of leaf from some of the plants.


Sunday, 11 April 2021

German Apple Bienenstich (Bee Sting) Cake

I've adapted this recipe from Dr Oetker's German website: https://www.oetker.de/rezepte/r/apfel-bienenstich-torte

Bienenstich is German type of cake. The word means bee sting, but it's not clear why they're called that, as they don't contain any honey. Instead, their key characteristic is their caramelised almond topping.

German cakes are usually delicious. But it's often hard to find the ingredients for them in the UK. I've therefore adapted this recipe so that UK ingredients can be used. I used Gala apples in mine, but if I make it again, I'll either pre-cook them a little ot try a different sort, as although these tasted good, they remained overly firm after being cooked. The cake freezes adequately. It doesn't look as good after being frozen and there's a little deterioration in texture (you probably wouldn't want to serve the defrosted version to guests), but it still tastes fine and is fundamentally still a nice cake you enjoy eating.

German Apple Bienenstich (Bee Sting) Cake
You will need a 26 cm springform cake tin (I've often been successful using a 23 cm tin and adapting the cooking time with other cakes, but this cake wouldn't fit in a smaller cake tin. You might get away with a 23 cm tin if you only only use 3/4 of the ingredients).

Ingredients
A little butter for greasing

Pastry:
350 g plain flour
135 g sugar
1 tsp vanilla extract (or essence)
1 pinch salt
125 g soft butter or margarine
2 eggs (medium)

Filling:
1.5 kg eating apples(this is usually around 11 or 12 eating apples)
250 g full fat crème fraîche
4 eggs (medium)
1 tbsp cornflour
85 g sugar
1 tsp vanilla extract (or essence)
1 tsp ground cinnamon

Topping:
75 g butter
75 g sugar
100 g whipping cream
150 g flaked almonds

Optional serving suggestion:
Whipped cream

1. Grease the base of the springform cake tin. Preheat the oven on to about 200 °C/180 °C fan.

2. Put the pastry ingredients in a mixing bowl and mix everything with a mixer using the dough hook to form a dough – start on on the lowest speed, then gradually increase to the highest speed. If your butter or margarine is too hard, this will take much longer (and you risk crumbs flying everywhere).

3. Separate the dough into two halves, then roll one half of the dough out on the base of the springform cake tin. Place the springform cake tin rim around it. 

4. Shape the rest of the dough into a sausage long enough to go all the way round the inside of the edge of the cake tin. Place it around the edge of the dough on the base of the springform cake tin and use your fingers or thumbs to press it against the sides of the cake tin, so that it goes all the way up to the top of the spring form cake tin.


6. Mix the crème fraîche with the eggs, cornflour, sugar, vanilla extract and cinnamon.

7. Core then peel the apples. Cut them in half, then cut each half into 6 to 8 slices (ideally smaller than I did). Layer the apple slices on top of the pastry in the base of the cake tin (the German recipe did not specify what it meant by "layer", so although I started off placing them neatly, I ended up piling them in. Possibly I should have tried to keep them in neater layers). 


8. Pour the crème fraîche mixture over the apples. 
9. Put the cake tin in the bottom third of the oven and bake for about 30 minutes.
10. While the cake is baking, make the topping:  melt the butter and sugar in a pan. On a medium heat, add the cream. Stir for about five minutes while the mixture thickens a little (mine did not thicken much at all).

11. Stir in the almonds. 
12. Once the cake is out of the oven, reduce the oven temperature to about 180 °C/fan 160 °C. Spread the topping over the part-baked cake, then return to the bottom third of the oven and bake for around another 40 minutes.
13. Leave the cake to cool in the tin on a cooling rack (this will take at least one hour). Then remove the cake from the tin. Serve with whipped cream, if desired.