Sunday, 13 September 2020

An intrepid adventurer in the garden

 The garden has a new and intrepid inhabitant, a tiny little mouse:

This mouse is crazily brave. We were sitting out in the garden and the mouse was running back and forth past us, near enough to get photos. It was a tiny little thing, much smaller than an average adult mouse, so it must be either a baby or a different type of mouse. It's adorable, but I think it may be responsible for the hole in one of my squashes. I had previously put this down to slugs, and now there is a hole it the squash's skin, the slugs are munching happily away, but I suspect the original nibbler may have been this mouse or one of its friends.


Wednesday, 26 August 2020

Can you still eat big patty pan squashes? One-pan cream cheese, patty pan squash and tomato pasta recipe

 I did an accidental experiment in the garden by failing to notice one of my patty pan squashes until it had reached a diameter of about 16 cm (6 inches) across. I so utterly failed to notice it, that I don't even know if it started off yellow like the rest of my patty pan squashes or was dark green right from the start. Here's a picture of a normal patty pan squash next to my huge one.

It was so big, I wasn't sure if it was still going to be worth eating. But it seemed a shame to waste it, so I thought it would be worth giving it a try. When I cut it in half, it had far more prominent seeds that the little squash:
It also weighed around 800 g, so I didn't think it was sensible to eat the whole thing at once. Instead, I cut myself a quarter of it, scooped out the seeds and peeled it (because I thought the skin might be too tough to eat) and cut it into bite-sized slices. The little, yellow patty pan squash didn't seem too prickly, so I simply cut that one up without peeling it. The seeds were so tiny that there was no need to remove them. I then put both in the recipe below (no photo, because it didn't occur to me at the time that I was going to be including this recipe on the blog until after I'd eaten it and realised how nice it was):

Cream cheese, patty pan squash and tomato pasta recipe

Serves 1 (ingredients can be doubled, tripled, quadrupled etc.)

Ingredients
Up to 250 g of patty pan squashes
Up to 250 g tomatoes (ripe)
40-50 g Philadelphia-style cream cheese
80 g pasta (e.g. penne)
salt
freshly ground pepper

Method:
1. Boil water in a pan.
2. Add the pasta and put the buzzer on for 4 minutes less than the recommended cooking time.
3. While the pasta is cooking, prepare the squash. If necessary peel the squash (if big or prickly) and remove the seeds (if the seeds are big), then cut into bite-sized slices.
4. When the buzzer goes, add the slices of squash to the pan and set the buzzer for the final four minutes.
5. Meanwhile, chop the tomatoes into approximately 1 cm chunks and remove the hard core beneath where the stem was.
6. When the buzzer goes, thoroughly drain the pasta and squash in a sieve or colander and put the tomatoes in the pan. Add the pasta and squash back to the pan and return to the heat for around 30 seconds to warm the chopped tomatoes.
7. Add the cream cheese, salt and pepper (make sure you add a decent amount of pepper, it really brings out the flavour of the cream cheese).
8. Stir thoroughly.
9. Serve.

I've been doing very well with avoiding powdery mildew on the squashes so far this year. The leaves of a few of the squashes, especially the patty pan ones, became infected with powdery mildew after the torrential rain we had. But I removed the leaves and tied the squash plants up better so more of the plant was off the ground, and now they look good.


Sunday, 9 August 2020

Orange and raspberry muffin recipe

I had one orange and one egg to use up plus more raspberries growing than you can shake a stick at, so I halved the quantities of a recipe for orange and raspberry muffins that I found online. The recipe was in cups, which was a bit of a pain (and reading it back, I notice I accidentally made some adaptations), but it turned out so delicious, I thought it was worth writing out a metric version, so here it is with my accidental adaptations (you'll need to halve the quantities if, like me, you've only got one orange and one egg left):

Ingredients (makes 12)

320 g plain flour

170 g cup white or golden sugar (plus extra for sprinkling)

3 tsp baking powder

1/2 tsp salt

1 pinch of ground nutmeg

1/2 cup  of vegetable oil (I used non-virgin olive oil)

235 ml whole milk

2 eggs (medium or large)

1 tsp vanilla extract

2 oranges (zest only)

570 ml fresh or frozen raspberries (approx.)

12 muffin cases

1. Put one of your oven racks in the middle position, then turn on the oven to 190 degrees C (no fan). Take out your muffin pans and put large muffin cases in 12 of the cups (in my muffin tin, the large cases stick over the top of the muffin tin - see photo above). Make sure you only have one case in each, I accidentally put doubles in several.

2. Stir the flour, sugar, baking powder, salt and nutmeg together in a medium bowl. Whisk the oil, milk, eggs, and vanilla together in another bowl. Finely grate the zest from the oranges, than add to the wet ingredients.

3. Make a well in the centre of the dry ingredients. Pour the wet ingredients and the raspberries into the centre (if you put them in frozen they will keep their form, if they are fresh or allowed to defrost they'll break up when you stir, which was delicious). Stir the wet and dry ingredients together until the dry ingredients are moistened but still a bit lumpy – do not over-mix the batter. Divide the batter evenly among the muffin cases (mine were only about 3 mm off full - you could also make smaller ones by 3/4 filling the cases). Sprinkle the tops of the muffins with sugar (about 1/4 teaspoon per muffin).

4. If you went with 12 nearly full muffin cases, bake for about 30 minutes. If you went for 15  3/4 filled ones, bake for about 25 to 30 minutes, rotating the pan halfway through cooking. You’ll know they are ready when they are golden brown (and a cake skewer comes out clean). Cool muffins in the pan on a rack for 5 to 10 minutes. Turn the muffins out of the pan and cool on the rack. Serve warm or at room temperature.


Harvest is coming


It's taken me a long time to get much to eat out of the garden this year, possibly largely due to slug and snail problems, but harvest is finally coming. Many of my apples are ripe. I know this because not only are they bright red, but they keep falling off the tree, and I keep eating them.
The raspberries are now producing more than I can usually eat in a day – I stir them into porridge – and I am freezing the rest.
The patty-pan squashes have also started producing edible squashes. You're meant to eat them when they're small. They have an incredibly boring flavour, so you have to put them with something more interesting. I've been having them with green beans and pasta and pesto and the few tomatoes that have ripened. It's nice to have a second sort of vegetable alongside the beans, and the plants seem to be producing fairly reliably now - not in the quantities a courgette would, but they're much lower FODMAP than courgettes.
My tomatoes have mainly yet to ripen, but they're getting pretty big, so I live in hope that they will soon.

The Maxima squashes are also coming along. This is my biggest one, and if it's anything to go by, the name is no lie: they're going to be huge.
I've accidentally also grown my most interesting sweet corn yet:
It's without any leaves covering it and it made me realise that each of the silks that stick out of the top connects directly to a different kernel of corn. It'll be interesting to watch it ripen.

The garden as a whole is looking dry anywhere I haven't watered (i.e. the grass), but I'm no longer worrying about whether I'm going to manage to harvest anything.


Wednesday, 15 July 2020

Roasted carrot soup

This soup is a variant of a soup recipe I found online because, as ever, I didn't have quite the right ingredients. It was, however, delicious in the variation I made it in, so I wanted to record it here. The recipe takes about an hour to an hour and a quarter.

Ingredients 

1.5 kg carrots

3 tablespoons olive oil

¾ teaspoon salt

2 medium onions

1 bock of frozen garlic (or 5 cloves of garlic, peeled and finely chopped or minced)

½ teaspoon ground coriander

¼ teaspoon ground cumin

1 litre of vegetable stock or chicken stock

1 teaspoon of cider vinegar or wine vinegar

freshly ground black pepper, to taste

Instructions

1. Preheat the oven to 200°C (fan). 

2. Peel the carrots and chop them into chunks of about 1.5 cm, only instead of just cutting fat coin shapes with your knife at 90° to the carrot, have your knife at an angle of about 45°, so that you end up with slanting chunks with more surface area.  

3. Place the chopped carrots on a baking sheet. Add 2 tablespoons olive oil and ½ teaspoon of the salt. Toss the carrots until they are coated in the oil and salt. Arrange them in a single layer on the baking sheet.

4. Put the carrots in the oven and roast until caramelised (brown) at the edges and easily cut by a fork, , tossing halfway through. This will probably take about 35-40 minutes, but may take as little as 25 minutes with thin carrots of some varieties.

5. During the last 15-20 minutes of the carrots roasting, peel and chop the onions. Add the remaining tablespoon of olive oil to a large saucepan on a medium heat. Add the onions and ¼ teaspoon of salt and fry for 5-8 minutes until translucent and softened.

6. Add the garlic to the onions and stir for about a minute or until the garlic has largely defrosted. Add the coriander and cumin and stir for another 30 seconds. Pour in the stock and give it a good stir.

7. When the carrots have finished roasting, add them to the saucepan of onions and stock. Add the vinegar and season with pepper to taste.

8. Bring the mixture to a boil over high heat, then reduce the heat for a gentle simmer. Cook for 15 minutes.

9. Remove the pan from the heat and let it cool for a few minutes. Then liquidise the soup in a liquidiser in batches, adding more water to adjust the thickness to your preference (and possibly to allow it to liquidise at all). I generally like my soups thick, so the picture at the top is of soup with the minimum necessary extra water added to let the soup liquidise.
Sunday, 12 July 2020

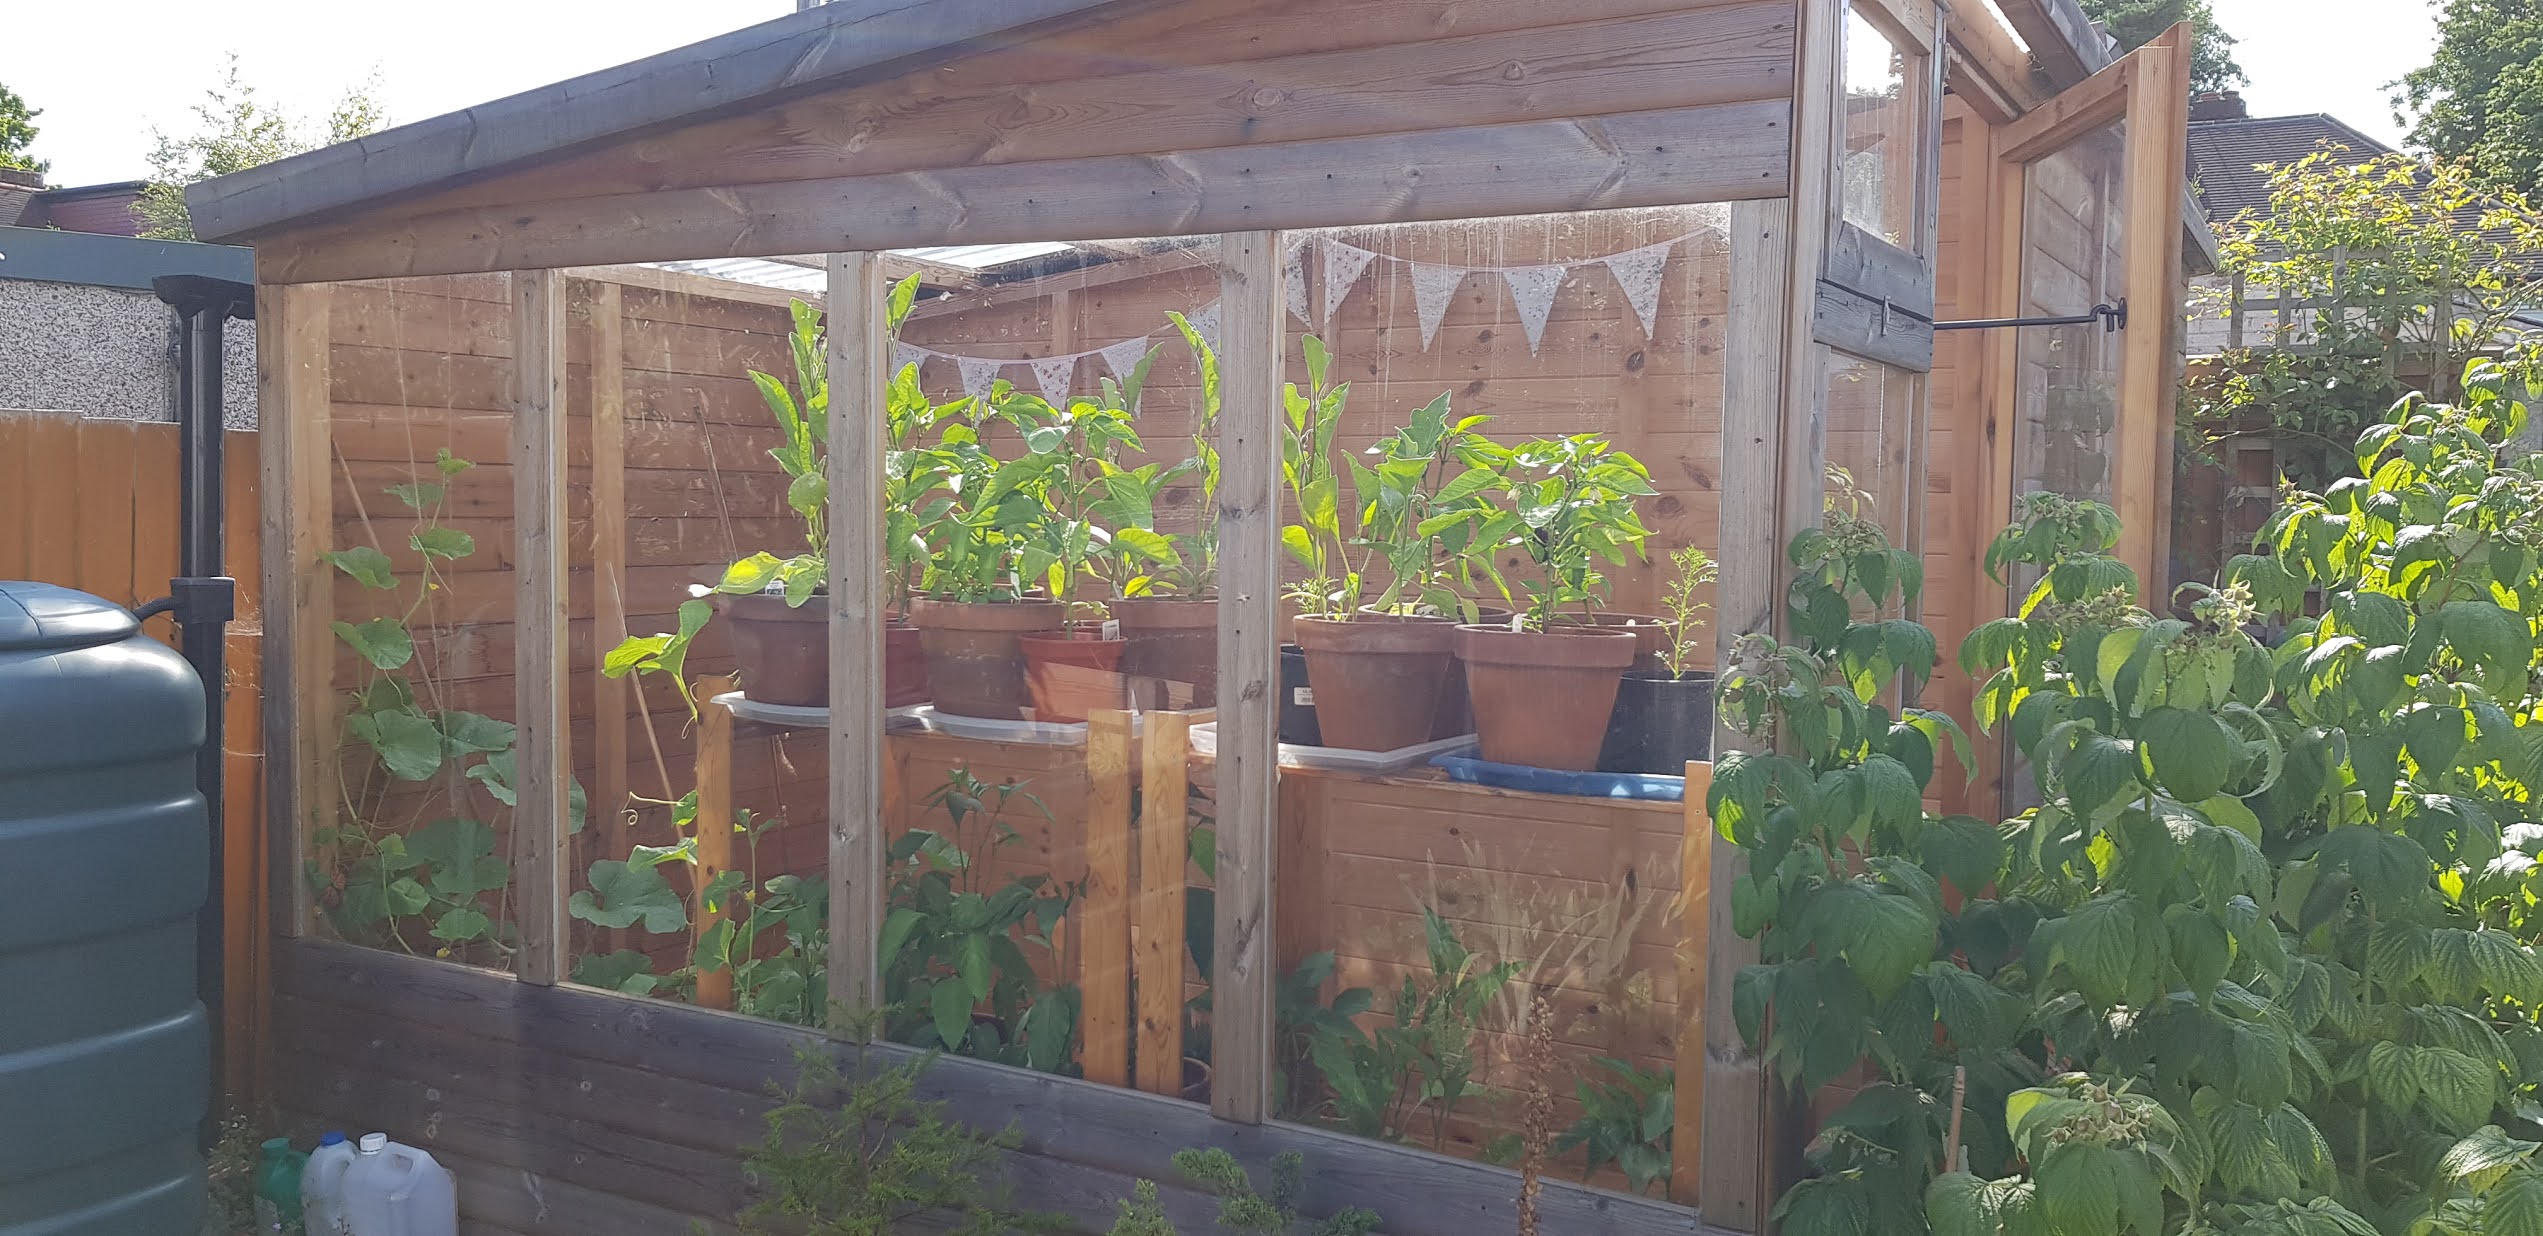
How to keep greenhouse plants healthy

I have loved my greenhouse since the moment it was built, but in the past I've had problems keeping the plants in it healthy. This year is my best year so far, so here are the tips about what I've done differently this year:
1. Grow all your own plants from seed. This way you know you're not accidentally importing any infestation.
2. Keep the greenhouse door and window shut as much as possible until the plants start to flower if you are only growing plants that cope well with heat. I only opened my door to go in and water every day before the plants flowered, and my aubergines, peppers and cantaloupe melons seemed perfectly happy with this level of heat. It's meant that I'm now only dealing with a relatively small greenfly infestation on my aubergines.
3. Keep an eye out for infestations and deal with them as soon as you spot them. My aubergines have had greenfly on them this year. I have dealt with these by crushing as many as I could on the leaves between my fingers and thumb (fingers one side of the leaf and thumb the other) - although watch out, aubergine leaves grow occasional spines, so make sure no spines are about to penetrate your skin when you do this. I also sprayed with a mixture of washing-up liquid diluted in plenty of water, because I didn't want to crush new leaf growth between my fingers and also I didn't think I'd squashed all the greenfly despite my best efforts. The washing-up liquid and water approach is a tricky balance. Too little and it won't kill the greenfly, too much and it will damage the leaves. I've erred on the side of not killing enough greenfly, so I still have greenfly, but my aubergines are all still alive and thriving.
4. If you don't have many flowers and don't want to open the door for bees yet. you can pollinate with a paintbrush. I'm pretty sure the purple pepper in this picture is a result of paintbrush pollination. Just brush the paintbrush over the centre of an open flower on one plant and then on the open flower of another plant of the same kind and back.
5. Make sure you fertilise. I've long been feeding my greenhouse plants with liquid seaweed feed once or twice a week. But this year I realised it probably didn't contain enough nitrogen for them, as the lower leaves have been going yellow, which is a sign of nitrogen deficiency, so I supplemented the liquid seaweed feed with chicken manure pellets placed on the top of the compost in the pots and watered in. This seems to have helped a great deal.
6. Grow chrysanthemums in the greenhouse. I should have started mine earlier, so they're not flowering yet. These are supposedly a deterrent to pests (possibly they simply have an overwhelming smell that pests find unattractive), and the greenhouse seemed to have fewer infestations last year when I grew them.

The rest of the garden is also looking good, although further behind where I'd like it to be. Regular evening patrols to collect slugs and snails seem to have helped a great deal and are allowing the garden to fight back from the devastation these caused earlier in the year:


Sunday, 5 July 2020

Relief that the lockdown vegetable garden is finally growing strong

The garden is finally growing. Despite living in London, where it's warmer than most of the rest of the UK, I'm behind Monty Don in Gardener's World and behind Alan Titchmarsh in Grow Your Own at Home. To be frank though, I'm relieved to have things growing at all, it's been such a difficult year. Lots of seeds didn't germinate at all. I've battled with slugs and snails stripping my plants of leaves and killing many of them, and I've had terrible black fly on my beans. In fact, the one positive side of the the slugs and snails was that they ate a lot of the black fly along with the leaves.


I have the suspicion that part of my problem is lack of access to a garden centre. Although they have reopened now, being a person with underlying health conditions, I'd rather my garden was less than perfect than that I end up a statistic. This has caused trouble in a number of ways. Firstly, I found myself largely relying on the seeds I already had. And some of those, although still in date, simply refused to germinate. This meant I had smaller numbers of plants than normal, so it was all the more important that the ones I did have were a decent size and weren't destroyed. Unfortunately, that frequently didn't go my way, and I had to start again with any seeds I had left or try and buy more where I could. This situation was worsened by not being able to get as much compost as I usually would, so my garden has been less well fertilised, causing problems for some of the plants that did grow. I've also been very worried that the miserable wet weather would give my tomatoes blight.

But now the worst finally seems to be over. My tomatoes have so far survived the rain blight-free, and one of the self-seeded ones that I had to use when I didn't have enough seedlings has even produced its first green tomatoes.
My sweet corn plants are finally growing well, all apart from the two at the shadiest end of the bed (they're so small that unless you look carefully, you won't spot them at all).
My beans finally look like they're going to survive the onslaught of slugs and snails, although it's still possible that not all of them will. While a few of my purple beans have made it to the tops of their poles and even produced beans, 
my runner beans are in a lot more trouble, having lost huge numbers of leaves. Most of the runner beans have considerably fewer leaves now than they did when I planted them, and it's possible that even with regular slug patrols every evening (see previous post), they might not survive.
I don't know what's happened this year. In previous years slugs and snails only ate my beans when they were young, tender seedlings. This year, they're eating any leaf they can get their mouths on. However, on the plus side, the ladybirds have finally arrived, so hopefully they'll deal with the black fly for me.
My squashes, although behind where I'd like them to be, also look like they're now pretty safe from slug attack.
In another plus, the greenhouse is looking healthier than ever. I have achieved this by largely keeping the door and window shut. There's nothing much in there that doesn't enjoy baking hot temperatures, so I've been watering plenty and keeping the heat in and the pests out. I've also got chrysanthemums in there, as they seemed to help prevent infestations last year, although my chrysanthemums are still currently seedlings. 

However, even with only leaving the door open while watering, one of my aubergines near the door has already got greenfly. 
I've dealt with it as best I can by crushing the greenfly between my finger and thumb and spraying with water with a dash of washing-up liquid, but my experience is that once a pest gets in there, that's it, I can never kill them all. Also, today I intentionally left the door open because my peppers have started flowering and I want the bees to pollinate them. I hope the plants are big enough and strong enough now to cope with whatever else flies in there. I've already sprinkled some chicken manure pellets in their pots, as I've noticed the plants' lower leaves going yellow, which means they're short of nitrogen, and chicken manure is a relatively nitrogen-heavy feed.