Before the storm rolled in, we had a mini precursor of wind and rain followed by sunshine, which left my plastic cloches wihout its plastic. Fortunately, no real harm was done, as it's protecting brassicas and they're a pretty hardy lot.
I responded by moving where I had my metal pegs, so there's now two at each end a few cm apart (alhough I had to remove one from the bamboo runner to do this, as I didn't have any spares). This seemed pretty successful, as the plastic remained more or less pinned through he ravages of Storm Katie with winds uo to 60 mph last night. OK, they didn't survive fully intact, but better than I'd expected.
Even the squash bottle cloches at the back only lost a couple, which didn't go very far.
I've now cleared the area at the back behind the apple tree. I've planted clover seeds around the tree itself because I hope that they will not grow so high it needs mowing. I didn't sow any right at the back because the plan is to move the compost heap there, as it's the least sunny corner of the garden, and although compost heaps also benefit from sunshine, my plants like it even more.
My seedlings I planted indoors have also started growing. It doesn't matter how often I plant seeds, I still find it exciting to see them come up, especially when the sun shines on them. Peas are particularly good because of how quickly they get big. The one in the front there only started showing through the soil at all two or three days ago.
Sunday, 27 March 2016
Saturday, 19 March 2016
Lentil and sweet potato curry
This recipe is a lovely vegan curry (providing you use a vegan curry paste and stock cube - my Patak's paste used to include lactic acid, but the jar I currently have appears not to. I'm not sure if the other acids in it come from non-vegan sources. I'm always shocked by how many animal-based ingredients turn out to be in unexpected products). It tastes so good even the confirmed carnivores in my life love it. The only vegetables in it that I can actually grow (at least until I get a greenhouse) are the onions, but you can't have everything!
Preparation and cooking time: about 60 minutes. Ideally put lentils in to soak an extra 20 minutes before you start.
Ingredients
150 g dried red lentils
2 medium/large sweet potatoes
c. 4-5 tbsp. olive oil
1 tsp. mild chilli powder
1 green pepper
1 red pepper
1 large onion
2 tsp. mustard seeds (brown look better, yellow are easier to find, both taste the same)
2 tbsp. of Patak’s mild curry paste
450ml of boiling water
1 vegetable stock cube (I used Kallo)
1 tin of black beans
1 handful chopped fresh or frozen coriander (optional)
1. Put lentils in a bowl of water and leave them to soak (ideal total soaking time: 45 mins, so best to put in about 20 mins before starting, but right at the start is enough time if in a rush).
2. Preheat the oven to 190°C/fan 170°C/gas 5.
3. Peel sweet potatoes and chop into large bite sized chunks (c. 2 cm3). Place in a shallow roasting tin and drizzle with a generous quantity of olive oil (around 3-4 tbsp. - the more you put in the better the mouth feel).
4. Sprinkle the sweet potato chunks with chili powder (about 1 tsp.), then stir to coat evenly in chili and oil. Put in oven for 15 mins.
5. Chop peppers and onions into large bite-sized chunks, but keep separate from each other.
6. After the sweet potatoes have done their first 15 mins, add the peppers in with the sweet potatoes, stir, then return sweet potatoes and peppers to oven for another 25 mins.
7. Heat 1-2 tbsp. of olive oil in a large saucepan on a high heat. Add the 2 tsp. of mustard seeds, cook on a high heat with the lid on the pan till the seeds pop (like popcorn) or for 5 mins, whichever is shorter. Then add the onion and fry for c. 4 minutes until soft.
8. Stir in the curry paste, then stir in the lentils.
You can get the curry paste from Sainsbury's, or in case you can't find it, here's a photo of the ingredients so you can look for something similar or put your own spices together (I've tried it with other curry pastes and it just doesn't taste right).
9. Add the boiling water. Add the vegetable stock cube and stir. Simmer for c. 15-20 mins until lentils are tender (if you use 100% tinned lentils, you need only simmer for 5 mins).
10. Chop one handful of coriander if using fresh coriander.
11. Stir in the tin of black beans.
12. Stir in the roasted sweet potatoes and peppers and all the oil from the roasting tin into the lentils. Stir in the chopped fresh or frozen coriander and keep on hob till everything is warmed through.
13. Serve on its own or with warm naan bread or chapatis.
Squash bottle cloches
I planted my lettuces under cloches made of squash bottles today. About 20% of the reason I did this was to help warm the soil and encourage the lettuce to grow earlier. About 80% of the reason was slugs and snails, as cloches are the only way I've managed to stop slugs and snails from eating my lettuce seedlings. Even if I put them in squash bottles with the tops cut off and the rims cut into sharp corners, my slugs and snails just climb over them and start chomping.
We did quite a lot of digging, raking, weeding and adding chicken manure pellets to get the bed ready for planting and we've now cleared out so much of the beds that the compost heap is finally full.
We reckon it'll only be a couple of weeks before it's all rotted down and we can fit some more in though. I've come to see the compost bin as almost magic, it reduces what's in it so quickly.
Saturday, 12 March 2016
Digging the beds
I'm not the only one who digs in my garden. Something has been digging in my strawberry bed.
Yesterday it was level, with clean, neatly spaced strawberry plants. I've done my best to put the earth back and I also buried some spiny sticks in there to deter anything digging with paws. They're not terribly spiny, but the best I've got at the moment. Things love digging up the earth in my front garden too and I find the properly spiny sticks are moderately successful, but only slightly spiny sticks not much of a deterrent. I'll probably stick some rose stems in later in the year, but for now these are the best I've got as I don't trust the brambles I dug up today not to start growing if I bury their stems.
I've been digging the garden too. I dug in some chicken manure pellets and fish, blood and bone before planting my brassicas that can be planted in March. I put a polytunnel cloche over the top, as I had one in the shed that I had no particular plans for and I hope it will encourage my plants to come up a bit earlier.
My radishes have started coming up already, both inside and outside my glass bell cloches, although they seem a tiny bit further advanced inside them.
Saturday, 27 February 2016
Laura's Spanish chicken
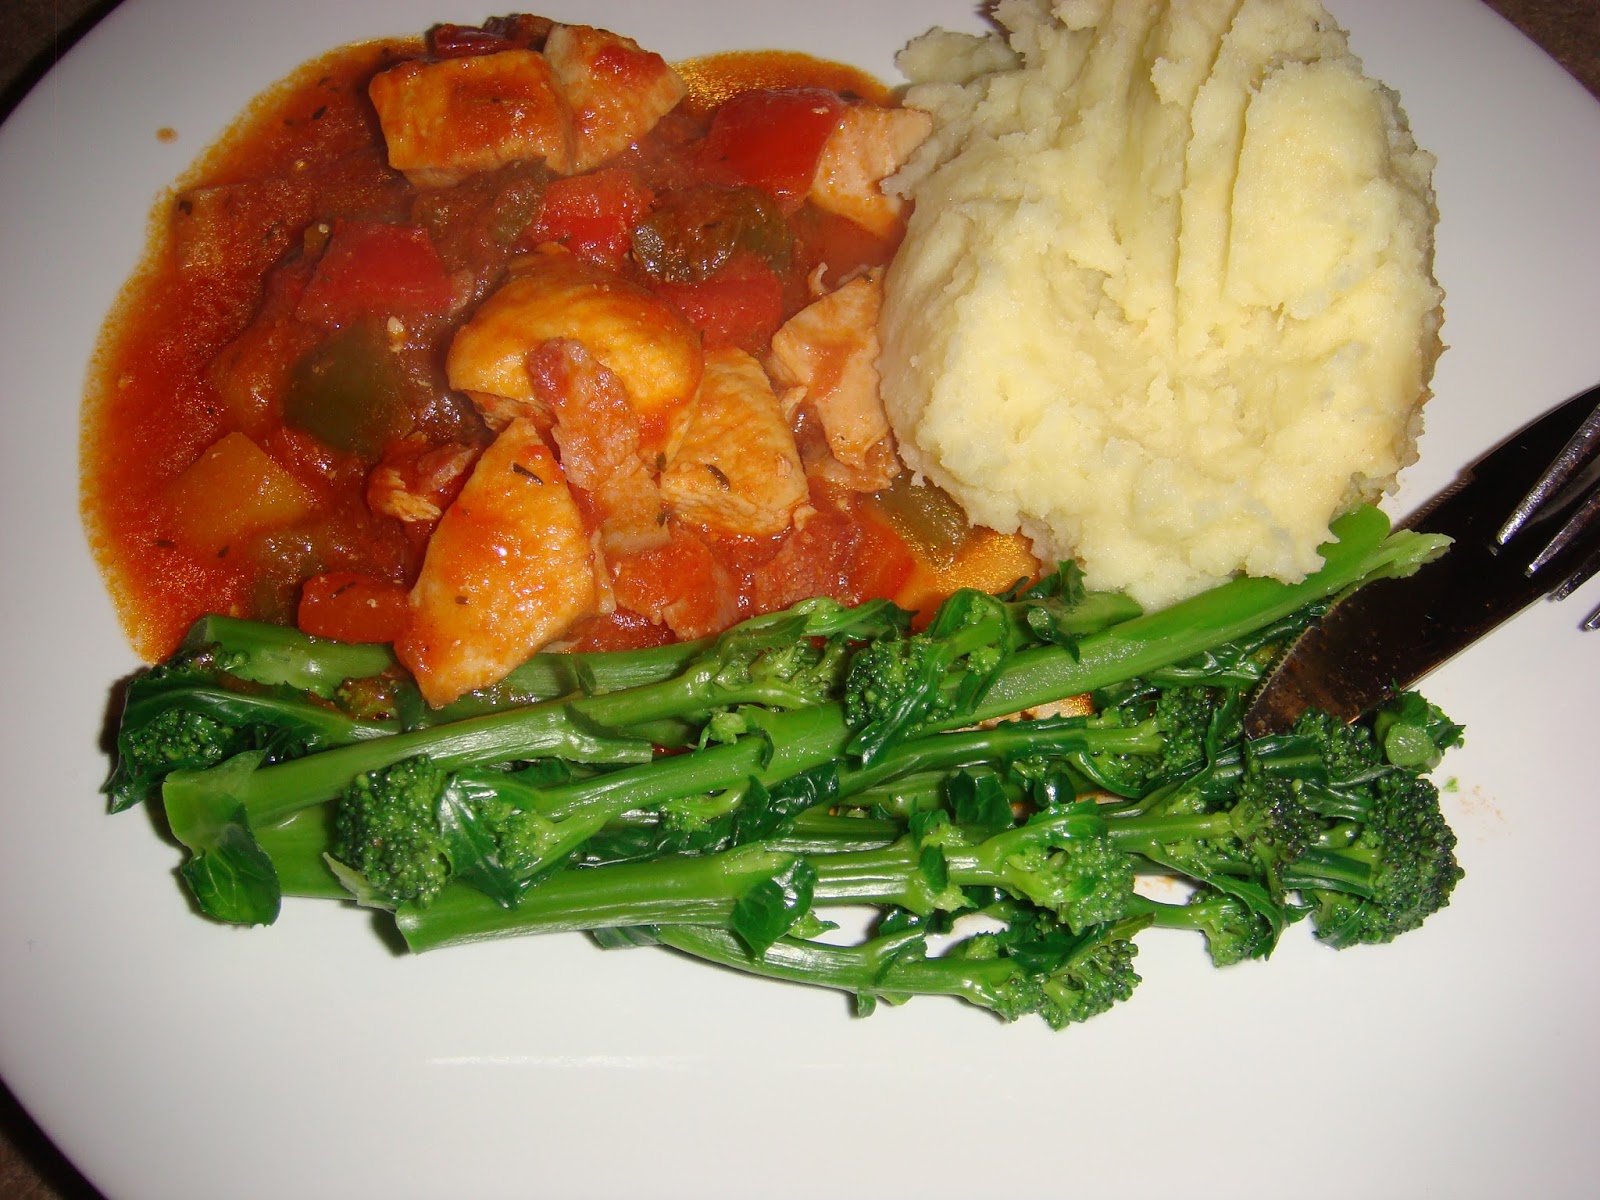
I got one portion from all the purple sprouting broccoli I grew - yes, that's right, just one! I ate it with my own recipe, Laura's Spanish chicken, so I thought I'd take the opportunity to put the recipe in my blog. It's a really quick and simple recipe that tastes really good (and is unusual in that it is completely without onions and garlic, so very handy for anyone who doesn't like or can't eat them). Anyhow, here it is:
Prep time: about 10-15 minutes. Cooking time: 30-45 minutes.
375 g diced chicken (large chunks)
8 rashers smoked streaky bacon
1 tbsp olive oil
3 peppers (1 red, 1 yellow, 1 green)
1 tin chopped tomatoes
1/4 tsp cayenne pepper
1/2 tsp thyme
1/2 tsp rosemary
1 tbsp white wine vinegar
1 chicken stock cube
1. Chop/cut the bacon into approximately 1 cm bits.
2. Put diced chicken and chopped bacon into a large pan or casserole dish.
3. While browning the meat, chop peppers into 2 or 3 cm x 1 cm slices.
4. Add peppers to pan, stir and simmer for 2 minutes.
5. Add cayenne pepper, thyme and rosemary and stir.
6. Add tin of tomatoes and a bit of extra water.
7. Add white wine vinegar and chicken stock cube and stir.
8. Simmer for 30-45 minutes.
Serve with mashed potato or couscous. Home-grown purple sprouting broccoli optional :)
Out with the old, in with the new
I've been having a bit of a clear up this weekend. This time it was the turn of the brassicas.
I've completely removed the kale, as most of it had bolted. The bolted (flowering) kale has gone into the compost heap and the rest has come into the kitchen to be eaten for tea, along with a couple of pieces of purple sprouting broccoli. The broccoli has survived the clear up so far because I found a couple more edible pieces, so I thought I'd give it a shot at producing a bit more.
But I've cleared the rest of the area and planted some broad beans I got at a local seed swap last night.
I've learnt from last year, so my label is therefore part way along the row and not braving the lawnmower right next to the grass (I now have a large number of snapped labels, which is a bit of a shame, as I bought them to be reusable).
My other half did the hard work clearing the bushes from the other side of the garden and then I finished it off with a final dig in of fish, blood and bone, chicken manure and some compost and a bit of a rake, before planting some radishes. That's me done now till March. Yay, two whole days off!
Saturday, 20 February 2016
New cloche
I bought a new cloche from Wilkinson's. Well, actually I bought two at a fiver each, although I currently think one might have been enough. The reason I wanted it was for the hoops, so I could use them to protect my carrots from carrot fly with fleece. But I've now realised that actually I can bring my veg on faster by using them as cloches with the plastic they came with.
I've used it with carrots for now anyway. I'll probably set the other one up so that I can start hardening off my seedlings in April later. It was easy enough to make. I just put the plastic rods together with the connectors to make longer rods, then pushed the ends of these into the ground to make hoops. They didn't make beautifully even ones like in the photo on the packet, but then the cover the hoops come with isn't the same one as on the packet either. They're good enough, and it was never going to be a beautifying feature for the garden.
The instructions said to do them about 50 cm apart, but actually the plastic they came with was cut on the generous side, so I ended up doing them about 55 cm apart. Although, to get the full 200 cm the packet advertises, you'd need to put the hoops about 67 cm apart, because there are only 4 of them. I'm not convinced the plastic is long enough to quite do that. Someone in the instructions and marketing department hasn't quite thought this through. Luckily I wasn't banking on a length of precisely 200 cm.
You pin the ends down with metal pegs.
You can buy more to pin the sides down or you can do it with stones. I used pretty heavy stones, but they've come off one side already because of the wind. I think you probably need something as heavy as a brick. I'm not going to buy any more metal pegs because I think if I put them straight through the plastic, the wind will just tear the plastic. And also, I'm pretty sure I can make good enough metal pegs myself out of an old metal coat hanger if I need any. I might try trapping the plastic under bamboo canes and pinning the ends of those to the grounds.
Having bought the cloche, I've ended up changing my original plan of how to plant the carrots and beetroots. The carrots are now going to be all along the cloche, which now encroaches into the area I'd planned for the beetroot, and I'm going to plant a line of beetroot along the back of the cloche because it doesn't need to be protected from carrot fly.
I've got one more cloche left to put up, but I haven't thought through where yet. Best to give my back a rest and leave it till next week I reckon.
I've used it with carrots for now anyway. I'll probably set the other one up so that I can start hardening off my seedlings in April later. It was easy enough to make. I just put the plastic rods together with the connectors to make longer rods, then pushed the ends of these into the ground to make hoops. They didn't make beautifully even ones like in the photo on the packet, but then the cover the hoops come with isn't the same one as on the packet either. They're good enough, and it was never going to be a beautifying feature for the garden.
The instructions said to do them about 50 cm apart, but actually the plastic they came with was cut on the generous side, so I ended up doing them about 55 cm apart. Although, to get the full 200 cm the packet advertises, you'd need to put the hoops about 67 cm apart, because there are only 4 of them. I'm not convinced the plastic is long enough to quite do that. Someone in the instructions and marketing department hasn't quite thought this through. Luckily I wasn't banking on a length of precisely 200 cm.
You pin the ends down with metal pegs.
You can buy more to pin the sides down or you can do it with stones. I used pretty heavy stones, but they've come off one side already because of the wind. I think you probably need something as heavy as a brick. I'm not going to buy any more metal pegs because I think if I put them straight through the plastic, the wind will just tear the plastic. And also, I'm pretty sure I can make good enough metal pegs myself out of an old metal coat hanger if I need any. I might try trapping the plastic under bamboo canes and pinning the ends of those to the grounds.
Having bought the cloche, I've ended up changing my original plan of how to plant the carrots and beetroots. The carrots are now going to be all along the cloche, which now encroaches into the area I'd planned for the beetroot, and I'm going to plant a line of beetroot along the back of the cloche because it doesn't need to be protected from carrot fly.
Edited: in the end I completely ignored my own intentions and decided that the £2 for 10 metal wire pins was well worth not having to try to cut through a metal coathanger. I stuck an extra one at the far end that had come loose, then pinned the side that kept blowing up down with two metal pins keeping down a piece of bamboo, but not piercing the plastic. I also found a couple of extra bricks in the garden, so added those and it looks a lot messier, but it hasn't come loose yet.
Subscribe to:
Posts (Atom)