I came back from holiday somewhat nervous. The Environment Agency had been sending me flood alerts while we were away abroad and I knew it had been bucketing it down and probably regularly temporarily flooding the garden. I was convinced I was going to come back to devastation, mildew and rot. But no. I came back to a green and verdant garden, with huge, healthy, bushy tomatoes, tall peas and sweetcorn, but a continuing failure for anything except weeds to grow up the far end by the shed. This is what it looked like after I spent all morning tidying it up:
And this is what it look like au naturel before I tackled the weeds and my other half dealt with the lawn:
The huge tuft of grass in the middle is from where an animal crept into the accidentally unlocked shed one night, pulled out a plastic packet of fertiliser and tore it open over that spot.
If nothing else, it's really convinced me of the value of fertiliser.
Before I went on holiday I decided to use shredded paper as a mulch around the strawberries (instead of straw) to protect them from the soil, as I didn't think the cardboard I'd already put down was doing a good enough job. I think it was only partially successful. I came back from holiday to a load of strawberries completely covered with a powdery mould, so I removed all of those. But I was left with a large number of red and delicious strawberries.
My apples are also growing well.
Sunday, 26 June 2016
Saturday, 11 June 2016
Flooding in the garden and a strawberry plant in a pot
There has been a tiny bit of flooding in the garden. It's been raining so hard in the latest summer storms that the garden isn't able to absorb all the water as it falls and temporarily floods. The water then drains once it stops raining. All the plants are surviving it fine so far, although I'm getting an even larger proliferation of ants than usual. Perhaps they like an aquatic environment.
Also, I put one of my strawberry plants in a pot with the thought that I could use it as a gift.
I originally put it in when it just had flowers and leaves on it. The leaves drooped almost immediately, so I took about half of the flowers off so that it didn't need to spend so much energy on them. It survived fine after a few days of leaf droop (so repot a week before you want to give it away) and is now happily producing strawberries. I had the basket from a plant someone gave me (that didn't survive the position I put it in). The strawberries have been particularly good because the flowers seem not to cause us any allergies.
Also, I put one of my strawberry plants in a pot with the thought that I could use it as a gift.
Sunday, 5 June 2016
First strawberry of the season
I think this is the tastiest thing I have ever grown in my garden. We've only had one so far, but I'm hopeful that more will ripen soon.
More of them are looking like they're beginning to turn red.
This first one was even the perfect shape, although others look less symmetrical.
In fact, the garden's generally looking pretty healthy at the moment.
More of them are looking like they're beginning to turn red.
This first one was even the perfect shape, although others look less symmetrical.
In fact, the garden's generally looking pretty healthy at the moment.
Sunday, 29 May 2016
Two herb gardens, different outcomes
I've planted two herb gardens with similar herbs.
They've both got sage in the middle, although the purple sage in the top photo is much bigger because it was an existing plant from a pot and not grown from seed. They've both also been seeded with parsley at the front, flat leaf in the top picture and curly in the bottom picture, but only one has grown. Then the bottom picture also has two types of oregano either side. None of it grew and the small scrap of oregano on the right is actually some I grew from seed in a pot last year. In fairness, the chives are also from a pot and not from seeds. I planted the rest of the segment with seeds, but they haven't grown at all yet. And my attempts to grow thyme round the edges are going equally badly except for the one I bought in a pot from B&Q. I'm beginning to see a pattern here or most of my herb seeds failing and existing plants from pots doing OK.
Given how the slugs suddenly started devastating my chervil (rear section of the top photo), it made me think maybe they'd been eating my seedlings in the bare earth plot as soon as they came up. So, much as I try and do without slug pellets, there are now slug pellets down just to give the seeds I've now freshly planted a chance.
The garden as a whole is thriving though.
They've both got sage in the middle, although the purple sage in the top photo is much bigger because it was an existing plant from a pot and not grown from seed. They've both also been seeded with parsley at the front, flat leaf in the top picture and curly in the bottom picture, but only one has grown. Then the bottom picture also has two types of oregano either side. None of it grew and the small scrap of oregano on the right is actually some I grew from seed in a pot last year. In fairness, the chives are also from a pot and not from seeds. I planted the rest of the segment with seeds, but they haven't grown at all yet. And my attempts to grow thyme round the edges are going equally badly except for the one I bought in a pot from B&Q. I'm beginning to see a pattern here or most of my herb seeds failing and existing plants from pots doing OK.
Given how the slugs suddenly started devastating my chervil (rear section of the top photo), it made me think maybe they'd been eating my seedlings in the bare earth plot as soon as they came up. So, much as I try and do without slug pellets, there are now slug pellets down just to give the seeds I've now freshly planted a chance.
The garden as a whole is thriving though.
Sunday, 22 May 2016
How to grow your own mint tea
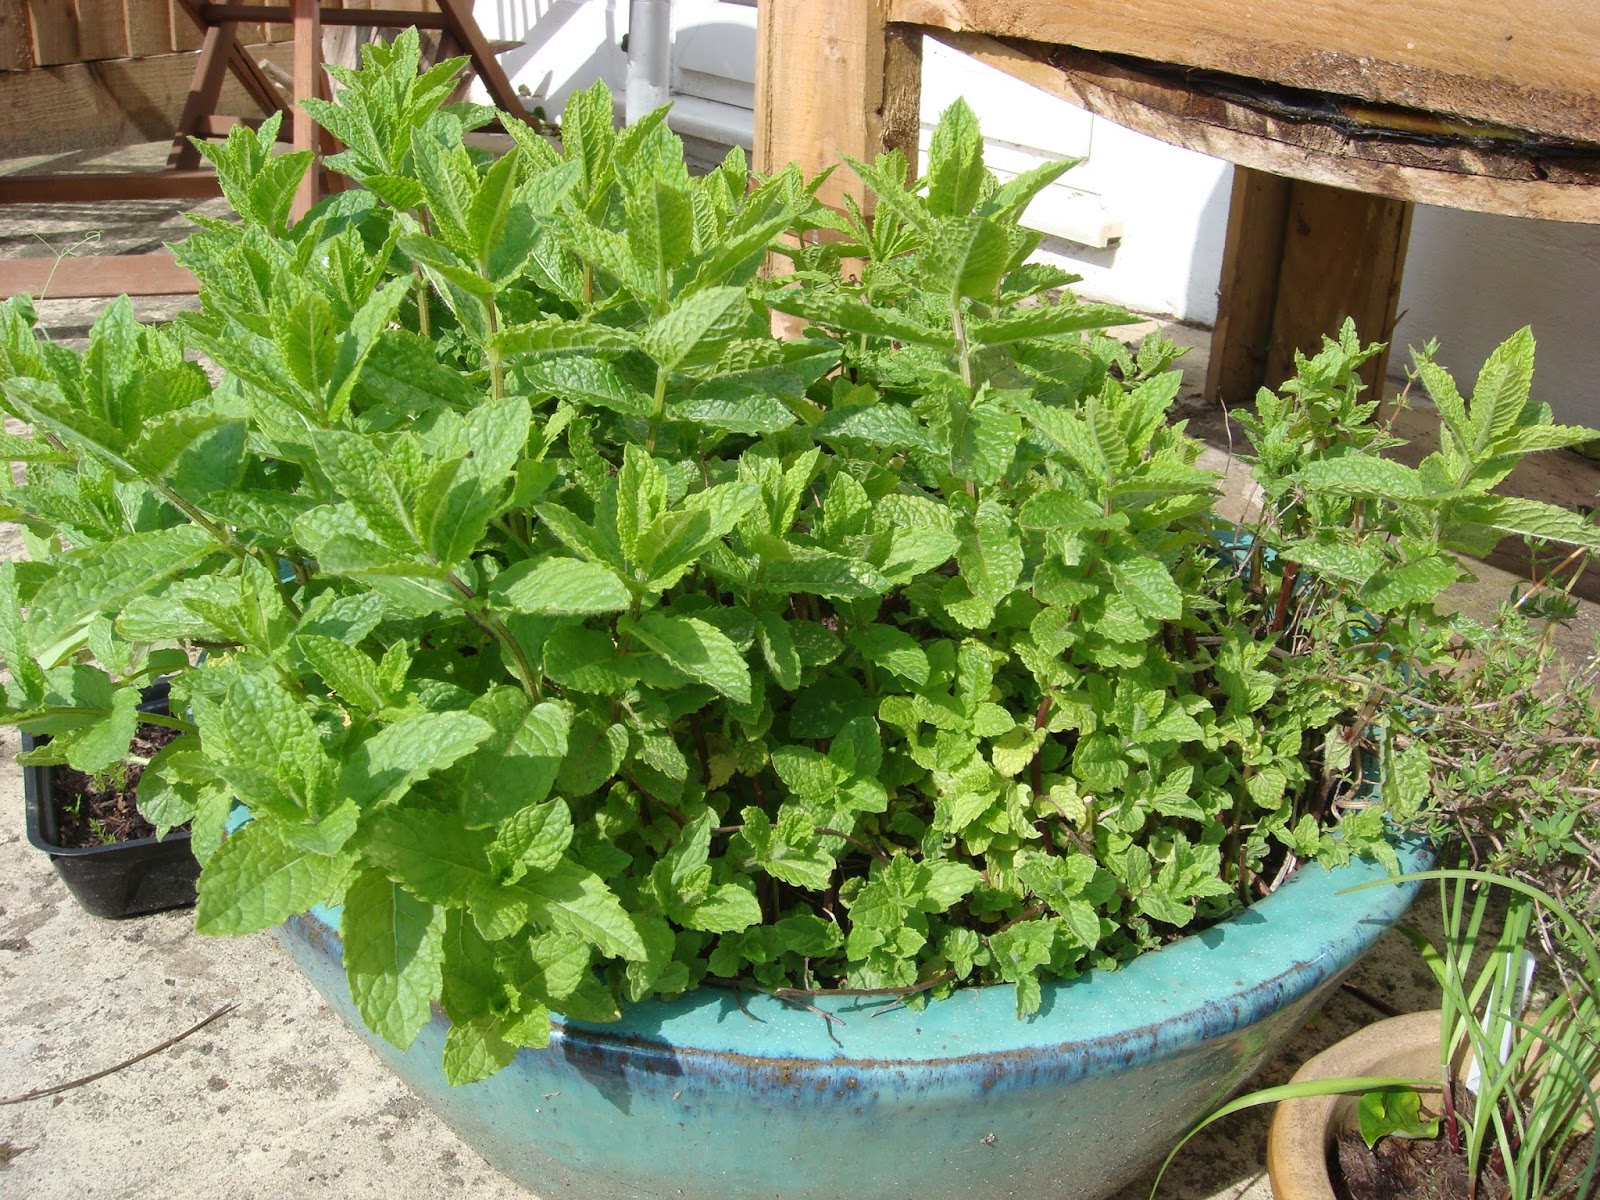
Mint is very, very easy to grow. I bought a small pot of it from a supermarket and then potted it on in one of my big pots outside. Alternatively if someone gives you some mint from their garden with roots on, there is every chance it will continue growing if you plant it in a pot of compost and water it in, or you can buy seeds if you want to choose the type of mint. I'm particularly fond of spearmint.
My tiny little pot of supermarket mint turned into this:
It's still in a pot because mint will take over your entire garden (and next door's too) given half a chance. It grows as easily as a weed, so the best policy is to keep it in a pot to stop it getting everywhere, just water it occasionally and away you go. You can also keep it indoors. Don't panic when it dies down over winter. That's just what mint does, it'll come back again in the spring.
To make a mint tea:
1. Snip off a sprig of mint.
2. Give it a rinse under the tap.
3. Put it in a mug (or put several sprigs in a teapot)
4. Add boiling water.
5. Optionally add honey, sugar or sweeteners.
6. Leave it to brew for a couple of minutes.
7. Drink and enjoy (I leave the sprig in, as I like the way it looks).
My tiny little pot of supermarket mint turned into this:
It's still in a pot because mint will take over your entire garden (and next door's too) given half a chance. It grows as easily as a weed, so the best policy is to keep it in a pot to stop it getting everywhere, just water it occasionally and away you go. You can also keep it indoors. Don't panic when it dies down over winter. That's just what mint does, it'll come back again in the spring.
To make a mint tea:
1. Snip off a sprig of mint.
2. Give it a rinse under the tap.
3. Put it in a mug (or put several sprigs in a teapot)
4. Add boiling water.
5. Optionally add honey, sugar or sweeteners.
6. Leave it to brew for a couple of minutes.
7. Drink and enjoy (I leave the sprig in, as I like the way it looks).
Saturday, 7 May 2016
Red wine and lentil shepherd's pie with sweet potato mash
I made a variant of a BBC Good Food recipe tonight. I varied it because I had too many carrots and not enough sweet potato and on top of that, while I was cooking it, I thought, hmm, this sauce would be nicer with flour thickening it. You can also make a vegan or a gluten-free version of this recipe, or if you really want non-vegetarian for some reason, add about 150 g of chopped bacon or lardons when you add the onions. Anyway, here's my version.
Prep time: 25-30 mins, cooking time: 20 mins
Ingredients
2 tbsp olive oil
1-2 large onions, chopped (I used frozen)
10 carrots, 4 cut into sugar-cube size pieces, 6 sliced
2 tsp dried thyme (or 2 tbsp fresh thyme, chopped)
200 ml red wine
100 ml boiling water
400 g can chopped tomato
2 vegetable stock cubes (I used Kallo)
410 g can green lentils
1 heaped tbsp flour (leave out or use gluten-free substitute for gluten free)
600 g sweet potato , peeled and cut into chunks
25 g butter (vegan margarine or olive oil for vegan version)
75 g (vegetarian) mature cheddar, grated (leave out or use vegan substitute for vegan)
Salt and pepper
Method
1. Heat the oil in a frying pan, then fry the onion until golden. (For non-vegetarian version add chopped bacon or lardons at this point.) Peel and chop the first 4 carrots to sugar-cube sized pieces.
2. Add the 4 carrots and all but a sprinkling of thyme. Pour in the wine, 100ml of boiling water and the tomatoes, then sprinkle in the stock cubes and simmer for 10 mins.
3. Meanwhile, put a pan of water on to boil, peel and chop the sweet potato and peel and slice the last 6 carrots. With five minutes left on the timer (i.e. 5 mins after you started simmering the red wine mixture), put the sweet potato and 6 sliced carrots in the pan of boiling water. Open the can of lentils, but do NOT drain.
4. When the buzzer goes, reset it for a further 10 minutes, set your oven to 200C/180C fan/gas 6, then tip the can of lentils, including their juice into the frying pan. Stir in the flour and add pepper to taste. Simmer for the 10 mins left on the buzzer until the carrots still have a bit of bite and the lentils are pulpy.
5. When the buzzer goes, turn off the hob (both pans), then drain then mash the sweet potatoes and sliced carrots. Add in the butter, season to taste and stir thoroughly.
6. Pile the lentil mixture into an ovenproof dish, spoon the mash on top, then sprinkle over the cheese and remaining thyme.
7. Cook in oven for 20 mins until golden.
Prep time: 25-30 mins, cooking time: 20 mins
Ingredients
2 tbsp olive oil
1-2 large onions, chopped (I used frozen)
10 carrots, 4 cut into sugar-cube size pieces, 6 sliced
2 tsp dried thyme (or 2 tbsp fresh thyme, chopped)
200 ml red wine
100 ml boiling water
400 g can chopped tomato
2 vegetable stock cubes (I used Kallo)
410 g can green lentils
1 heaped tbsp flour (leave out or use gluten-free substitute for gluten free)
600 g sweet potato , peeled and cut into chunks
25 g butter (vegan margarine or olive oil for vegan version)
75 g (vegetarian) mature cheddar, grated (leave out or use vegan substitute for vegan)
Salt and pepper
Method
1. Heat the oil in a frying pan, then fry the onion until golden. (For non-vegetarian version add chopped bacon or lardons at this point.) Peel and chop the first 4 carrots to sugar-cube sized pieces.
2. Add the 4 carrots and all but a sprinkling of thyme. Pour in the wine, 100ml of boiling water and the tomatoes, then sprinkle in the stock cubes and simmer for 10 mins.
3. Meanwhile, put a pan of water on to boil, peel and chop the sweet potato and peel and slice the last 6 carrots. With five minutes left on the timer (i.e. 5 mins after you started simmering the red wine mixture), put the sweet potato and 6 sliced carrots in the pan of boiling water. Open the can of lentils, but do NOT drain.
4. When the buzzer goes, reset it for a further 10 minutes, set your oven to 200C/180C fan/gas 6, then tip the can of lentils, including their juice into the frying pan. Stir in the flour and add pepper to taste. Simmer for the 10 mins left on the buzzer until the carrots still have a bit of bite and the lentils are pulpy.
5. When the buzzer goes, turn off the hob (both pans), then drain then mash the sweet potatoes and sliced carrots. Add in the butter, season to taste and stir thoroughly.
6. Pile the lentil mixture into an ovenproof dish, spoon the mash on top, then sprinkle over the cheese and remaining thyme.
7. Cook in oven for 20 mins until golden.
The stages of an apple blossom from bud to blossom
Subscribe to:
Posts (Atom)