Monday 28 August 2017

Garden curry (vegan/vegetarian recipe)

I saw a curry on Gardener's World and liked the look of it a lot, but I couldn't find the recipe, so I ended up making up my own. I based it largely on what I had in the garden and in the fridge and also on this recipe from Tesco.
Anyhow, it turned out to be incredibly delicious and I am under instructions from my other half to make it again exactly like I made it the first time. My theory is that you can be pretty flexible about most of the veg in it, but the pineapple is essential and probably also the okra and aubergine. Anyhow, here's the original recipe:

Garden curry recipe (mild)
Serves 6

2 heaped tbsp coconut oil
1 large onion (=200g), peeled and diced (frozen is fine)
1 block of frozen garlic (=approx. 4 cloves of garlic, crushed)
1 block of frozen ginger (=approx 3 cm of a ginger root, crushed)
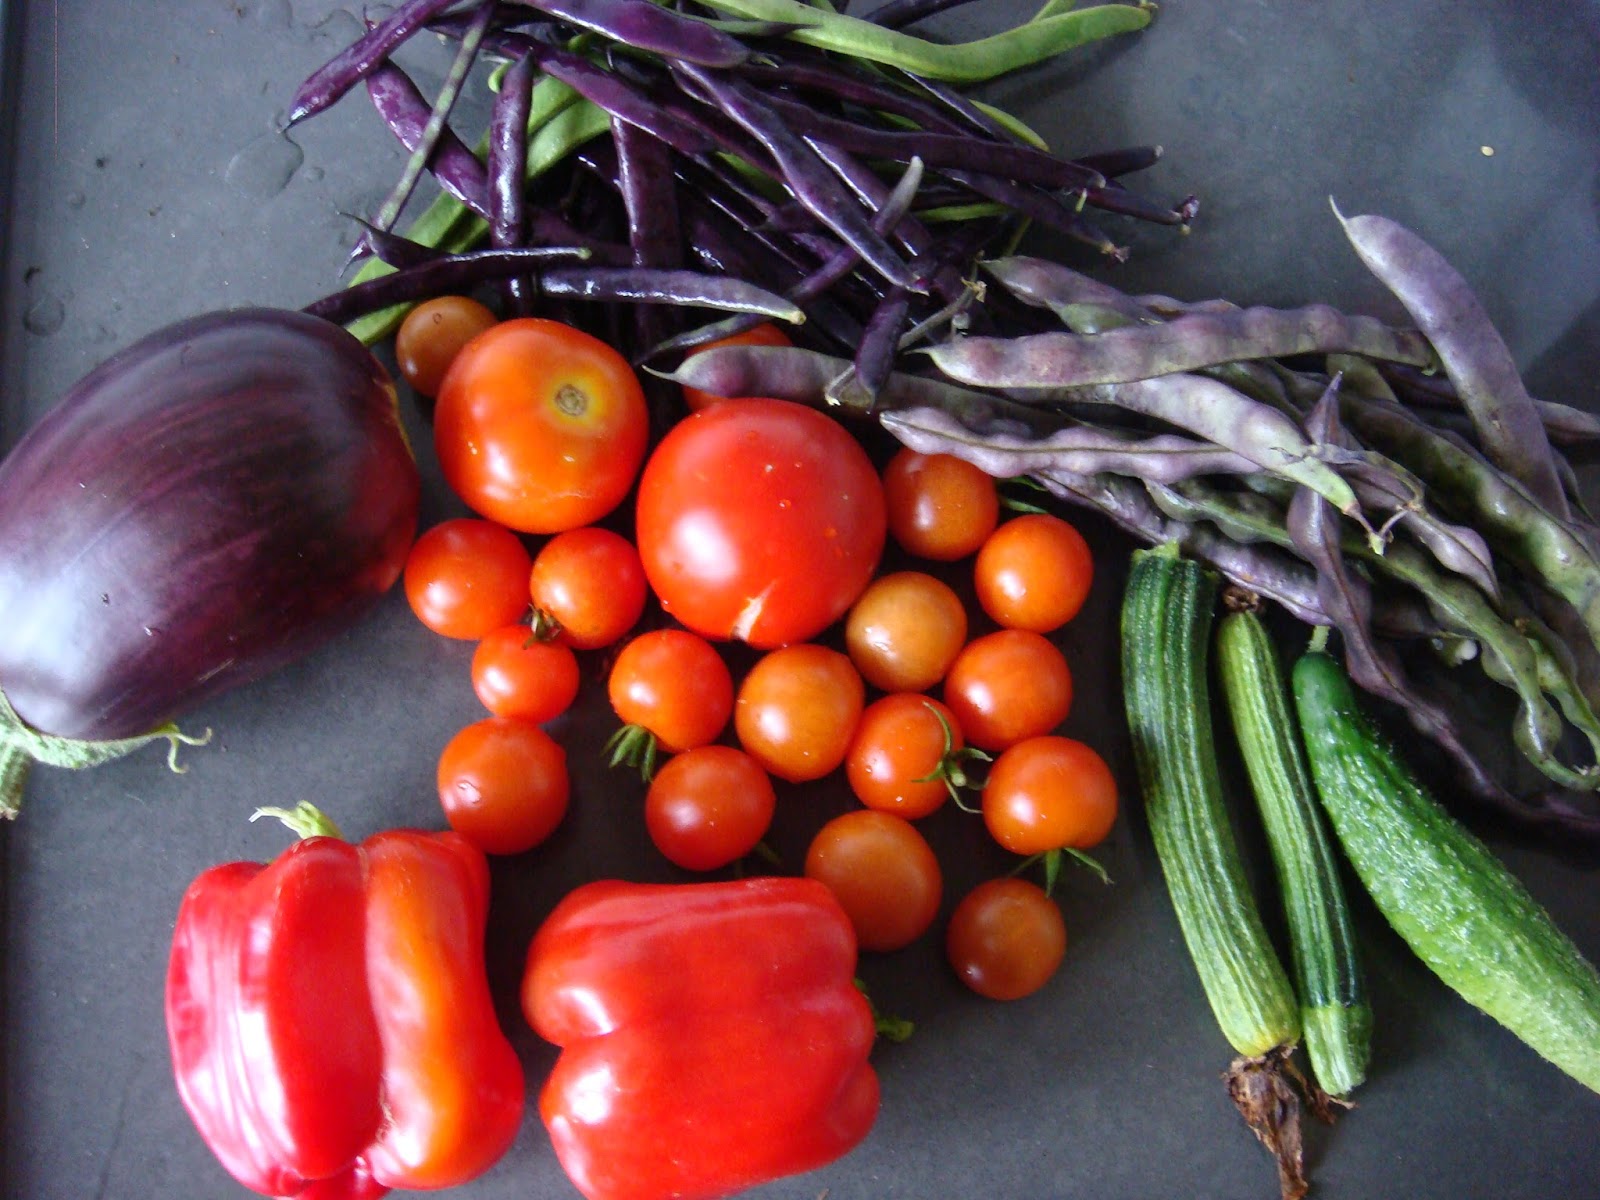
1 aubergine (approx. 300 g), cut into chunks
200 g okra, cut into chunks
1 red pepper, chopped
1-2 courgettes (approx. 50-100 g), chopped
60 g cucumber, peeled and chopped (optional)
50 g podded beans from runner or French beans (optional)
1 tsp ground fenugreek
1 tsp cumin
1 pinch chili flakes (feel free to add a load more chili if you love your curries hot)
1/2 tsp turmeric
500 g tomatoes, chopped (ideally skinned)
1 fresh pineapple, peeled and chopped
500 ml boiling water
1 tbsp tomato puree
4 tsp tamarind sauce (optional)
200 g runner beans/French beans, chopped
4 tbsp natural yogurt (optional - leave out for vegan version)

1. Heat the oil in a very large pan (I used a Le Creuset casserole dish).
2. Add the onion and cook for 10 minutes, until softened, stirring occasionally. While it is cooking, (peel and) chop more of the vegetables for the recipe (in the order they appear in the list of ingredients - you can see what size to chop them from the pictures below - the rough rule of thumb is bite size).
3. Add the garlic and ginger to the onions. Keep chopping vegetables until the garlic and ginger have defrosted and can be stirred into the onions (about 5 minutes).
4. Add the aubergine and stir occasionally for 5 minutes. During that 5 minutes, keep chopping vegetables!
5. Add the okra, red pepper, courgette, cucumber and any podded beans (I only ended up with a few, they took forever to shell).


6. Stir in the ground fenugreek, cumin, chili flakes and turmeric.
7. Add the tomatoes and the pineapple.
8. Add 500 ml of boiling water, the tomato puree and (optionally) the tamarind. Bring to the boil, then reduce the heat and simmer for 20 minutes. While it's simmering, chop the runner/French beans if you haven't already done so.
9. Add the runner/French beans and simmer for another 4-5 minutes.
10. Optionally serve with yogurt on top. Serve with rice or naan or chapati or anything else you usually serve with curry. I served mine with some paratha that I found in the freezer section at Morrison's and they were gorgeous.
This is what it looks like if you don't add the tamarind

Thursday 24 August 2017

Curried cottage pie recipe

This is one of our favourite recipes. I haven't included it before because I haven't often included vegetables from the garden in it. This time, because our local supermarkets no longer sell pre-chopped celery, carrot and onion, I had to chop my own and included some carrots from the garden in it.
What happens when you grow your carrots in stony ground
I also managed to include one of the milder chilis we grew.
Anyhow, here's the recipe with options for swapping things out, in case you can't get pre-processed ingredients or can and want to save time.

Curried cottage pie
Serves 6 when I serve it, could potentially serve 8 smaller appetites
Takes about 90 minutes - 2 hours

2 tbsp olive oil
750 g of minced beef (I used frozen)
120 g celery, finely chopped
120 g carrots, peeled and finely chopped
120 g onion, finely chopped (you can use a frozen/pre-chopped mix of these 3 veg, I recommend 350 g of it)
1 small chilli, with a hotness of your choice, finely chopped (or 1/2 tsp mild or strong chilli powder, according to taste)
2 tsp ground coriander
1 tsp ground cumin
3 tsp (mild) curry powder
1 tbsp tomato puree
1 beef stock cube
200 g passata (I freeze any leftovers in an ice cube tray)
2 tbsp Worcester sauce
optionally: 150 g of runner beans, green beans or other beans, topped and tailed and chopped
1.2 kg potatoes
700 g frozen carrot and swede mash, frozen (or 340 g carrot, 340 g swede, 20 g butter)
50 g butter
2 tsp nutmeg
salt and pepper to taste.

You will need: a large pan (e.g. a casserole pot), a large oven proof dish and a potato masher.

1. Heat the olive oil in a very large pan, e.g. a casserole pot. Brown the mince. While it is browning stir occasionally and get on with the next step.
2. Finely chop the celery and peel and finely chop the 120 g of carrots and the onion. (Tip: if you have to buy more celery than you need, you can finely chop it and freeze it in bags of the right weight for next time.)

3. Once the mince is browned, set it aside (I put it in the oven-proof dish I'm going to make the curried cottage pie in).
4. Add the chopped onion, celery to the large pan and stir for a few minutes. While stirring, get on with the next step.
5. Finely chop the chili - if you can't take much chili heat like me, make sure you remove all the seeds - and add to the large pan. Feel free to use more and/or hotter chili than my recommendation if you prefer something hotter.
6. Add the coriander, cumin and curry powder and stir for one minute.
7. Add the tomato puree, stock cube, passata and Worcester sauce plus 400 ml (3/4 pint) of boiling water.
8. Return the mince to the pan and simmer for about 35 minutes. Meanwhile continue with the next step.

9. Peel the potatoes and cut into even chunks. If you are using fresh carrot and swede instead of the pre-made mash, also peel these and cut them into chunks. Boil the potatoes (and the 350 g each of carrot and swede if using fresh) for about 20 minutes until soft. While these are cooking, get on with the next step.
10. If using pre-made frozen carrot and swede mash, microwave/pan heat it as per the instructions.
11. Pre-heat your oven to 200° fan/220° non-fan.
12. If using beans, top and tail them and chop to 2-3 cm lengths.
13. Mash the potatoes (and fresh carrot and swede if using fresh), mix in the butter (70 g if using fresh carrot and swede, otherwise 50 g), nutmeg, salt and pepper to taste, and carrot and swede mash.
13. Season the mince mixture to taste with salt and pepper. If using beans, add the beans to it and stir, then spoon the mince mixture into the large ovenproof dish.
14. Spoon the mash over the mince mixture and spread to cover evenly.

15. Cook in oven for 25-30 minutes.


Saturday 19 August 2017

Courgette, herb and Parmesan soup

This courgette soup is delicious and the perfect way to use up a glut of courgettes - including huge ones. I used a single 2 kg courgette to make the soup.
Not the courgette I used in the soup, I reckon this one is 3 kg or more
Courgette, herb and Parmesan soup recipe

NB This soup needs liquidising.

2-3 tbsp olive oil
3 tsp/3 cloves garlic, chopped (frozen is fine)
1 tbsp basil leaves, chopped (frozen is fine)
salt, to taste
pepper, ground, to taste
2 kg courgettes, unpeeled, chopped into chunks of about 2 cm
1 chicken or vegetable stock cube/stock pot/1 tsp vegetable bouillon powder
1 tbsp parsley, chopped (frozen is fine)
50 g/4 tbsp finely grated Parmesan (optionally plus extra to serve)

1. Chop up the courgettes into chunks of about 2 cm across. Leave the skin on. Don't bother removing the seeds.
2. Heat the oil in a large pan over a medium heat.
3. Add the garlic and heat for 2-3 minutes, stirring regularly.
4. Chop the basil and add to the pan.
5. Add the courgette and some salt and pepper (about a 1/2 tsp of each). Stir, put the lid on the pan if it has one, and simmer on a low heat for 10 minutes. A lot of liquid will come out of the courgettes.
6. Add the stock cube and stir (ideally until it has dissolved).
7. Simmer for 8 more minutes, uncovered.
8. Chop and add the parsley. Grate and add the Parmesan. Stir.
9. Remove from the heat.
10. In as many batches as necessary, liquidise the soup in a liquidiser or food processor until smooth.
11. Return to the pan (or the tub you're going to store it in).
12. Serve with bread and optionally with extra Parmesan sprinkled on top of the soup.


Saturday 12 August 2017

Slightly problematically sugar-free beetroot, raspberry and chocolate cake

These raspberries are not ripe yet. I picked all the ripe ones for my cake.
I was in two minds whether to include this recipe, because it's somewhat problematic. The problem is that I made it free from added sugar, because I try to avoid added sugar, and when you eat it like that, the cake is weirdly moreish, but also an intense-cocoa-powder experience that is probably too much for most people and made me think I shouldn't make this cake again, despite its perfect moist texture and weird moreishness (it really is weird, I spent my whole time eating it thinking I wasn't keen on the flavour, but I really wanted some more).
My other half has no such qualms about sugar, so I covered his slice in maple syrup, and he said it was restaurant-quality food and I had to put the recipe on the blog (and he is not a man afraid to say when he thinks my cooking experiments haven't worked out).
I suspect the correct answer is to include sugar or your favourite sugar substitute in it while baking it. I'm not entirely sure how much. Based on the recipe I adapted this from, my guess would be 250 g of caster sugar, but I haven't tried this, so can't be certain it doesn't change the recipe, for instance changing the delicious moist texture my other half loved so much. I was hoping the raspberries and beetroot would together be sweet enough to make the cake palatable, but even in my world of thinking most things are sweeter than everyone else because I barely eat sugar, I found this bitter. Interestingly, my other half didn't find his single mouthful of un-syruped cake bitter, so whether you find such highly chocolatey but unsweetened cakes bitter may depend on your genes. It's quite possible I'm something of a supertaster.
A lot of the quantities in this recipe are based on how much I happened to have easily available from the garden (the raspberries were all my ripe raspberries). Generally people say you're not supposed to mess with baking recipes, as they can go horribly wrong, but I've often found that if I change the amount or type of fruit in them, I mainly end up having to adapt the baking time and don't ruin anything critical.
Anyhow, here's the recipe, feel free to run your own experiments from it:
Slightly problematically sugar-free beetroot, raspberry and chocolate cake

275 g cooked beetroot (chop into 4 pieces and boil for 30 mins to cook if not buying pre-cooked)
3 medium eggs
200 ml mild olive oil (the sort they recommend for general cooking, when you don't want too much olive flavour - you could use other oils instead)
1 tsp vanilla extract
150 g cocoa powder
200 g plain flour
2 tsp baking powder
optionally: 250 g of caster sugar (untested, impact on texture and bake time unknown)
245 g raspberries
You will need a liquidiser or food processor to make this like I did.

1. Preheat your oven to 180°C/160°C fan/gas mark 4. Grease 2 sandwich tins with oil or butter. Line them with baking parchment if they don't have removable bases (I simply cut a c. 20 cm wide strip of baking parchment that was long enough to stick out each end and put it across the middle of the tin - it's the lazy way to line sandwich tins, but doesn't give such perfect results as cutting the paper to fit perfectly).
2. Put your (cooled) boiled beetroot and the oil in your liquidiser or food processor and then crack in the eggs and add in the vanilla. Liquidise/food process them until you have a smooth pink liquid To do this without a food processor, grate the beetroot and then stir/whisk the aforementioned ingredients by hand (this will change the finished texture).
3. Sift the cocoa powder, flour, and baking powder together into a large bowl. (If you were going to add sugar, now would be the time.) Mix the dry ingredients, then make a well in their centre.
4. Pour the pink liquid into the well in the dry ingredients.
5. Mix together. I used a spatula and the resulting mixture was quite dry.
6. Roughly chop the raspberries.
7. Add these to the cake mixture and stir well. This will make the mixture much wetter and will largely break up the raspberries and leave the raspberries distributed within the mixture to different degrees, so you run into occasional pockets of intense raspberry in the finished cake.
8. Divide the mixture between your two sandwich tins and smooth down with a spoon or spatula so that the surface is level.
9. Bake in the oven for around 25 minutes. If you insert a skewer into the cake it should come out clean when the cake's done. Also, when the cake's done, if you push its surface down a little, it should rise back up when you let go.
10. Turn out to cool on a cake rack.
11. You now have options about how to serve it. 
I served individual slices from a single sandwich layer, like a fancy chocolate torte from a restaurant. 
If you have no issues about eating sugar or similar substances and you didn't already add sugar, I recommend drizzling maple syrup all over it. This solves all of the problems about it not being sweet enough, but completely takes away the point of not adding sugar. 
Alternatively, you could serve it with single or double cream.
Or you could put the two layers one on top of the other with raspberry jam or Philadelphia-style soft cream cheese or Mascarpone or whipped cream (optionally with raspberries) or icing* (for instance chocolate icing, raspberry icing** or icing for red velvet cake) in between and optionally with more icing or cream over the top or over the rest of the cake.
Doing something along the lines of a black forest gateau, but with raspberries instead of cherries might work well.
All of these suggestions except the maple syrup and serving it plain are untested, but they feel like good flavour matches to me.
*Icing is called frosting in US English.
** Confectioner's sugar is US English for icing sugar and you can convert cups to grams here or you can use a measuring jug. One US cup is 236.6 ml.

Saturday 5 August 2017

Storms fell giant sunflower

When life gives you lemons, make lemonade. It wasn't my plan to use my sunflowers as cut flowers, but when the storms the other day knocked one over completely, the choice was in a vase or in the compost heap.

It knocked over or broke quite a bit of the sweet corn too. I tried to stabilise the sunflower while the storms were going on, but I only made it worse, and it tipped over and ripped itself out by the roots. I've now pinned up the sweet corn with bamboo canes, and am simply having to live with the fact that although my row of sunflowers looks less impressive, sunflowers do make great cut flowers, so the garden's loss is the kitchen's gain.

The tomato experiment - greenhouse v. outdoors - part 2 - the findings


The tomatoes in the greenhouse grew much bigger much quicker than the tomatoes outside. The tomatoes outside have reached about 50 inches, the ones in the greenhouse around 70.

But interestingly, the Moneymaker plants both inside and outside the greenhouse produced ripe tomatoes on roughly the same day.
I wasn't paying enough attention to be absolutely certain which came first. I think it was probably the ones in the greenhouse, but it was definitely close. However, both the greenhouse ones and the outdoor Moneymaker tomatoes were pipped to the post by my miniature Gardener's Delight tomatoes growing outdoors, which ripened a few days earlier.
What I've really learned from this is that nothing I did with the greenhouse produced me tomatoes any earlier, but the plants are bigger and currently have more fruit on them. They're also more work because I often have to water the tomatoes in the greenhouse 2 or 3 times a day when it's hot. And I have less space available in the greenhouse, so I can produce a similar number of tomatoes outdoors simply by growing more plants.
Nevertheless, I like having tomatoes in the greenhouse, as the first year I ever tried to grow tomatoes, it rained and rained and rained and was cloudy and cold, and my tomatoes all got blight (or something long those lines) and never gave me a single tomato. Growing a couple in the greenhouse is likely to provide a hedge against that, as they are protected from both cold and rain in there. On the other hand, they're huge plants, so I don't want to grow too many of them in the greenhouse, especially not if they're perfectly happy to grow outside. I might try and see if I can grow a greenhouse-only tomato next year for more variety. Currently I'm most enjoying my greenhouse for things it's hard or impossible to grow outside in the UK. That's plants like bell and chilli peppers and aubergines.