
Monday, 28 December 2015
Christmas wreath with cayenne peppers
I didn't dare eat the cayenne peppers I grew because they're probably really hot and I don't do well with that sort of hot, so I decided to put them on a Christmas wreath instead.

Leftover turkey curry with winter squash

I came up with another recipe to use up my winter squash sweet dumpling. In this case it also used up leftover turkey from Christmas. It was completely gorgeous, so here's the recipe (sorry for the very loose quantities, I made it up as I went along and was amazed by how well it turned out).
Winter squash and leftover turkey curry (1-1.25 hours prep & cooking time)
3 tbsp olive oil
3 large onions, chopped (or equivalent amount of chopped frozen onion)
1 cube of frozen ginger (about 2 cm x 2 cm x 1 cm or equivalent amount of crushed ginger)
1 tsp frozen garlic
leftovers of 1 cooked turkey (I reckon mine probably had about 5 portions left on it) - you could probably make this with fresh turkey
leftover roast potatoes or a any cooked potatoes (about 3 portions' worth if you were having a roast)
3 heaped tbsp Patak's tikka masala paste
1 400 ml tin of coconut milk
2 medium winter squashes (or 1 large butternut squash or equivalent quantity of squash)
4-6 heaped tbsp full fat Greek yogurt
1. Heat olive oil in a large pan.
2. Chop the 3 onions, add to pan and fry on a low heat (until soft and golden).
3. While the onions are frying, tear the cooked turkey off the carcass and tear into roughly bite-sized pieces.
4. Add the ginger and garlic to the pan as soon as you are done with the turkey and stir.
5 Once the onions are soft and golden and the ginger and garlic have been in the pan for about a minute, add the turkey and stir.
6. Turn the over on to 180 degrees C with fan (200 without).
7. Add the tikka masala paste to the pan and stir.
8. Add the roast/cooked potatoes and stir.
9. Add the coconut milk and stir.
10. Add some water so that it seems like the consistency of a good moist curry (probably 200-500 ml).
11. Chop the winter squash in half and scoop out the seeds, then cut into wedges (don't bother trying to take the skin off while it's raw, it's impossible unless you're using butternut squash, in which case go ahead and peel it now, then cut it into chunks).
12. Smear some olive oil over the base of a roasting tin and arrange the squash wedges/chunks on the roasting tin and put it in the oven.
13. Put the lid on your pan, turn the temperature right down so it's just simmering and put your timer on for 40 minutes.
14. Take the squash out of the oven and check that it is soft (if it isn't, put it back in the oven for 5 minutes), then leave it for 5 minutes to cool down.
15. Turn the oven and the heat under the pan off. Scoop the winter squash away from its skin in chunks using a spoon and add it to the pan, then stir (if using peeled butternut squash chunks, just break these down to bite-sized pieces and stir).
16. Add Greek yogurt to taste and stir.
17. Serve with rice or naan bread or couscous (I'm allergic to rice, so I serve a lot of dishes that traditionally go with rice with couscous).
The photo above doesn't do it justice, the turkey practically dissolved and it was one of the best curries I've had in a long time.
Wednesday, 9 December 2015
Cheat's Version of Jamie Oliver Simple Baked Lasagne

I made Jamie Oliver's simple baked lasagne for the second time last night because it is delicious and also because it uses up the squashes I grew. However, it is also a lot of work, so the second time I made quite a few modifications to make it easier, with no significant change to the taste. That said, I wasn't able to bring the time it took down below 2.5 hours (although I think I could have cut another 30 minutes of that if I hadn't failed to read ahead in the recipe). In case you would also like to make the simpler version, here's what I did (with pictures along the way to help you):
WARNING: Start cooking at least 2 hours before you want to eat, 3-3.5 hours to follow the full cooking times recommended by Jamie.
Ingredients for the meat part
4 rashers pancetta or smoked bacon, finely sliced
1 pinch cinnamon
200 g (=about the volume of 2 onions) Sainsbury's frozen finely chopped vegetables (=chopped carrot, onion and celery, replaces 1 onion and 1 carrot)
2 tsp frozen garlic (replaces 2 cloves of garlic)
5 rounded teaspoons of dried herbs, e.g. herbes de Provence or thyme, rosemary, oregano, sage (replaces 2 handfuls fresh herbs: sage, oregano, rosemary, thyme)
olive oil
600 g frozen beef mince (replaces 400g beef mince, 200g pork mince)
2 x 400 g tins of chopped tomatoes
2 glasses red wine or water (= about half a tomato tin of liquid)
2 bay leaves
1 butternut squash , halved, deseeded and roughly chopped
2 heaped tsp of ground coriander (replaces 1 tablespoon coriander seeds, bashed)
1/2-1 tsp red chilli flakes (replaces 1 dried red chilli, bashed)
salt
black pepper
1 packet of fresh lasagne sheets (ideally 400 g, but I tried freezing my leftovers last time and they were horrible after that, so on the basis of waste not want not, just use whatever pack size you can find)
400 g mozzarella , torn up (or simply 2 balls of mozzarella, unless you have use for the the remaining bit you will be left with from the fact no one seems to sell 200g mozzarella balls)
Ingredients for the white sauce
500 ml crème fraîche (or 600 ml if like me you can only find 300 ml and 600 ml pots)
optional: 3 anchovies , finely chopped - I leave this out, I'm allergic to fish
2 handfuls of grated Parmesan cheese - Jamie says freshly grated, using pre-grated saves time and washing up
a little milk , optional
Method:
0. Start 2-3.5 hours before you want to eat - 2 hours for quick cooks prepared to skip part of the recommended cooking time, 3.5 hours for less speedy cooks who want to cook for as long as Jamie recommends, somewhere in between for any other combination (I removed an hour of the recommended cooking time for my version).
1. Preheat the oven to 180ºC/350ºF/gas 4.
2. In a large casserole-type pan slowly fry the pancetta and cinnamon until golden, then add the frozen finely chopped veg, the garlic, the herbs and about 4 tablespoons of olive oil.
3. Mix these together, then add the frozen beef.
4. Cook for about 5 minutes, then add the tinned tomatoes and the wine or water.
5. Add the bay leaves and bring to the boil.
6. Get some greaseproof paper, wet it and place it on top of the pan with a lid placed on top as well.

7. Then place in the preheated oven for about 1 hour (Jamie Oliver says 2 hours in the oven or simmer on the hob over a gentle heat for around an hour and a half). Go immediately to the next step of this recipe, you don't have time to sit down yet.

8. Peel, deseed and slice your butternut squash (if you are using up a winter squash with the sort of skin that refuses to come off when it's still raw, just slice and deseed, you can take the skin off when it's cooked). Rub your squash slices with olive oil, and sprinkle with salt, pepper and the ground coriander plus chilli flakes to taste (not much if you're a wuss like me). Place on a baking tray and roast in the oven for the last 45 minutes of cooking the sauce. If you're like me, it's taken you about 15 minutes to get your butternut squash to this stage, so just stick it straight in the oven and make sure there's 45 minutes left on the timer, the meat will be sufficiently done when the squash has had its 45 minutes. You can now go and do other things until the timer goes off (although if you are grating your own Parmesan, doing that grating should be one of those things).

9. When the timer goes off and the sauce is done, take it and the squash out of the oven.
10. Mix together your crème fraîche, anchovies (if using), and a handful of Parmesan.

11. Season the crème fraîche mixture and also the meat mixture with salt and pepper. You may need to loosen the crème fraîche mixture with a little milk.
12. Turn the oven up to 200ºC/400ºF/gas 6.
13. To assemble the lasagne, rub an earthenware lasagne dish with olive oil. Jamie Oliver then says to lay some sheets of lasagne over the bottom and drape them over the sides. I found this quite hard to interpret, so I did this:


15. Add about a third of the white sauce and a sprinkling of Parmesan (I used too much white sauce and had to skimp on the other layers).

16. Break the butternut squash into pieces/use a spoon to scoop out the winter squash away from the skin and use this as one layer.

17. Assess whether the sheets of lasagne you have left will only be enough for one more layer or whether there's enough for two. If you have enough for two, add another layer now, like I did, if not save your remaining sheets for the top.
18. Add the rest of the meat mixture in another layer (whether or not you've added in a layer of lasagne sheets).

19. Then add half the remaining white sauce (a third of the total white sauce - I didn't have as much left as I'd have liked as I didn't realise I needed to split it into thirds).

20. Add your final layer of lasagne sheets and fold in any bits of lasagne sheet hanging over the side.
21. Spread your remaining white sauce across the lasagne sheets, making sure that all parts of the pasta sheets are covered, unless you like crispy bits, in which case the way I did it is enough.
22. Tear up your mozzarella and scatter this over the top, then sprinkle with the last of the Parmesan.

23. Cook in the preheated oven for 30–35 minutes until golden.
In case you want to make Jamie Oliver's original version of this recipe, you can find it here. I highly recommend this lasagne. It is one of the nicest things I've ever cooked (and I've cooked a lot of nice things), and on top of that, although there are a lot of stages to this recipe, none of them are complex or need more than a pretty basic level of skill.
By the way, on the off chance that any supermarkets ever read this, I would love to be able to buy frozen mince with high welfare standards, particularly outdoor-reared, but organic would be fine (I just want the animals have led a happy life). Buying high-welfare fresh mince and freezing it myself is not as good, because you have to carefully defrost home-frozen mince before using it, whereas you can use producer-frozen mince straight from the freezer.
Saturday, 28 November 2015
Carrot and beetroot harvest


Sunday, 22 November 2015
First frost and cayenne pepper success
We had our first frost of the season last night. My nasturtiums in the front garden have clearly not survived it, which made me rather worried for my back garden vegetables.


But I can't imagine they like frost, so I picked them and brought them in. Cayenne pepper strikes me as way too hot for me to eat in fresh pepper form - I can more imagine accidentally ruining a chilli con carne, so I pretty much don't dare to put them in food. Instead, I have two potential plans for them. Firstly I'm planning to include them in a Christmas wreath and secondly, we've had a spate of fox clubs chewing the ends off car aerials in our area (ours has already been partially masticated), if that starts happening again I'll be then I'll be giving fox cubs the shock of their lives with cayenne juice rubbed on the aerial.
In rather less good news, my leeks are all having to go in the bin, they have some sort of red insect in them. A search of the Internet suggests that a) the pests are allium leaf miners and b) now I have them the only remedy is disposal and crop rotation to avoid them coming up in next year's. They're in all of my leeks, so we're going to dig them up as soon as the ground becomes workably warm. The correct solution, which I've now discovered too late for this year is I should also have added a horticultural fleece from October to November as barrier protection to protect the leeks from them.


So I went out to have a look at if my cayenne peppers or bell peppers were still salvageable. The answer with the bell peppers was a resounding no, the answer with the cayenne peppers appears to be yes:

In rather less good news, my leeks are all having to go in the bin, they have some sort of red insect in them. A search of the Internet suggests that a) the pests are allium leaf miners and b) now I have them the only remedy is disposal and crop rotation to avoid them coming up in next year's. They're in all of my leeks, so we're going to dig them up as soon as the ground becomes workably warm. The correct solution, which I've now discovered too late for this year is I should also have added a horticultural fleece from October to November as barrier protection to protect the leeks from them.
 |
| Probably an allium leaf miner |
Monday, 2 November 2015
How to make leaf mould
Leaf mould is a kind a nice, rich kind of compost that you make from leaves. I went and gathered my leaves in a neighbouring street, as my garden only has one tiny tree and there aren't any trees down our road. The neighbouring road in question is a nice quiet one. This is good for two reasons: 1. fewer people pass by to give you strange looks for gathering up leaves from the pavement and street and 2. the trees haven't spent all year being polluted by vehicle fumes (conventional wisdom is that this is a bad thing for the compost you make).
So, here are the instructions:

1. Gather some leaves in a plastic bag the size of a bin liner.
I found the most efficient way of doing it was to sweep the leaves together with a garden broom, then use a dustpan and brush to grab them and deposit into the bag - more like using tongs or chopsticks than like using a dustpan and brush.
The BBC says: Oak, alder and hornbeam will soon rot down, while sycamore, beech, horse chestnut and sweet chestnut take a little longer. Leaves from conifers and evergreen plants will take between two and three years to compost and are best added in small quantities only, shredding them first to help speed up composting.
I don't have the faintest idea what sort of leaves I've gathered. Some small, red thick ones at the top of the bag and some large yellow, thin ones underneath. Given that the yellow ones had already started to rot in the road, I think the rough rule of thumb is the thicker the leaf, the longer it takes to rot.
2. Poke some holes in the bag.
My bag came with holes already in it, as it was previously the bag the council gathered garden waste in before they switched their system and they never survive more than two collections without the addition of a few tears.

3. Sprinkle on some water - not too much, you don't want them to go slimy (in fact that's what the holes in the bag are for, to let water out and stop them getting all slimy).
4. Tie up the top of the bag and leave somewhere shady and not too conspicuous for 1-3 years (1 year = low quality leaf mould, 2 years = high quality leaf mould providing you've used easy-rot leaves, 3 years = high quality leaf mould even if you used stubborn leaves.
I'm leaving mine behind the shed, at least until we get a new shed. Then I'm going to have to think of a new home for it.
Sunday, 1 November 2015
Season of mists and mellow fruitfulness in the vegetable garden

It's certainly a lot neater than it was less than a month ago (the brown things in the middle of the lawn are sunflower heads that I put out for the birds, but they showed no interest).


Wednesday, 28 October 2015
Roasting winter squash
This is how I roasted my winter squash for my latest batch of autumnal winter squash soup. First I cut it in half and scooped the seeds out. Then I cut it into segments like this:
 I didn't peel the skin off them first because with winter squash sweet dumpling the skin is so tough it's hard enough to cut them, peeling them raw is practically impossible.
 I then poured olive oil on them and squooshed them around in it to make sure they were thoroughly coated before baking them for 45 minutes in a 190° oven. They came out all squishy and delicious. It's possible I could have got away with a slightly shorter bake time.


50 shades of carrots
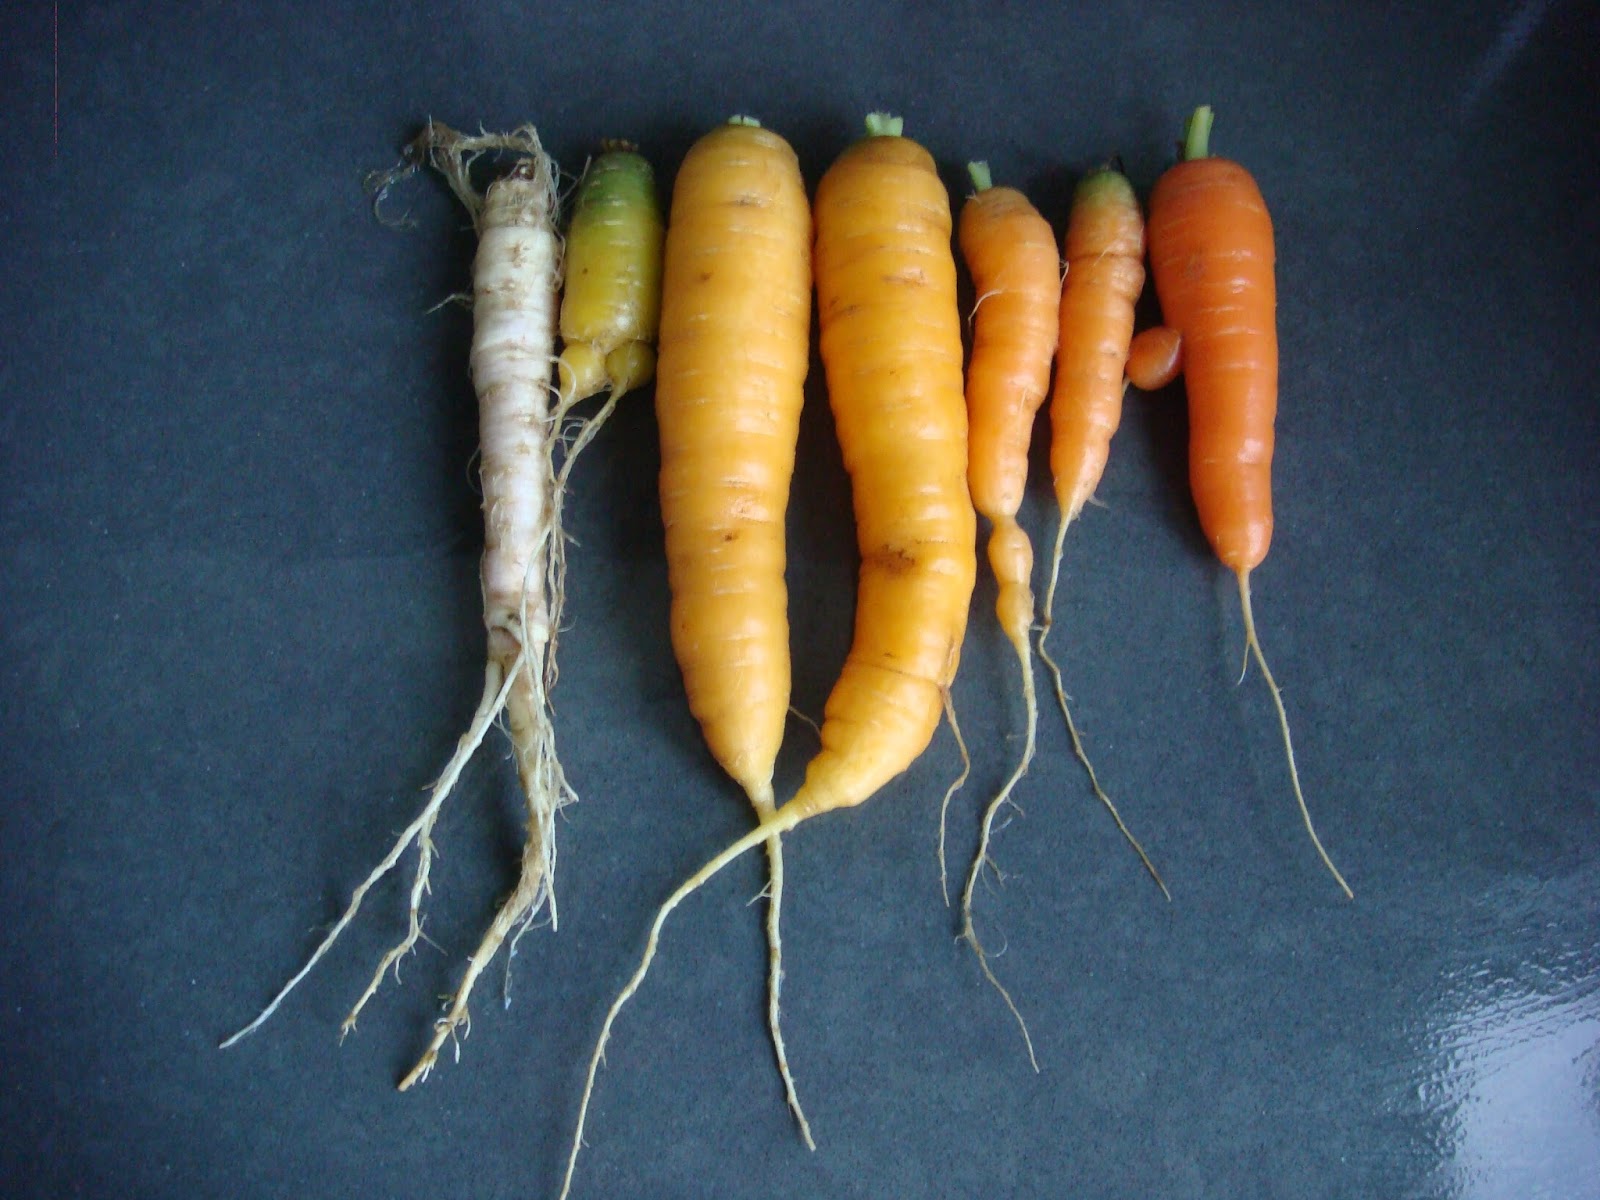
I picked carrots from the line that's supposed to have white carrots in it and got a variety of colours. The pure white ones are generally practically inedible, they're so tough and scrawny. I got the seeds form the allotments where I did my course. They'd produced them themselves. I suspect their white carrots of having mated with orange carrots, hence the variety of colours. I might give it a go from the seed they look like they're trying to produce themselves this year - some of the carrots from the line decided they were annuals not biennials (=flower in the 2nd year) and bolted, so I may get seed.
Wednesday, 14 October 2015
Autumnal winter squash and ginger soup
When I found two of my squashes lying rotten on the ground, I decided it was time to harvest.
 In terms of storage, I've had to compromise. Not having a cool room to put them in (the shed absolutely boils when it's sunny), I've decided to store them as decorations in the lounge.

 I've already eaten a couple of them in soup. It was tasted of autumn (and would have been vegan if only I'd used a different vegetable stock, but didn't make my husband complain about lack of meat so must have been good.)
Here's the recipe (all amounts are approximate and can be varied), you will need a blender or similar device to blend this, although it's probably pretty nice even without blending:

2-3 tbsp olive oil
1 bay leaf
2-3 tsp garlic, crushed or chopped (I used frozen)
2-3 tsp ginger, crushed or chopped (I used frozen)
1 tsp ground cumin
1/2 tsp nutmeg
1 tsp dried rosemary
2 medium onions, diced
2 large potatoes, cubed into c. 1 cm cubes (skin left on)
500 g carrots, sliced (skin left on)
1 medium and 1 small sweet dumpling winter squash, deseeded and roasted with the skin still on
1 vegetable stock cube
boiling water, enough to cover veg (probably about a pint)
Method:
0. Roast the squash in advance. See link. NB I roasted mine by halving them, scooping out the seeds, smearing them in olive oil and putting them on a baking tray on the bottom shelf of fan oven for an hour at 190 degrees while I was roasting some beef on the shelf above.
1. Heat oil in a large saucepan on a low heat and add bay leaf, garlic, ginger, cumin, nutmeg and rosemary.
2. Add the chopped onions and fry until soft, stirring occasionally.
3. While the onions are sauteeing, prepare (=wash and cube into 1 cm cubes) the potatoes. Add these as soon as the onions are nice and soft.
4. Keep stirring the veg in the pan occasionally and while doing this prepare (=wash and slice) then add the carrots.
5. Keep stirring the veg in the pan occasionally and while doing this separate the squash from its skin and add the flesh of the squash to the pan of veg. I recommend spooning/scraping the flesh of the squash out with a spoon.
6. Crumble in the stock cube into the pan, then add the boiling water to cover of the vegetables.
7. Bring to a simmer, put the lid on the pan, turn the heat down very low and leave on a low heat for 20 minutes.
8. Allow to cool until cool enough for your liquidising device, remove bay leaf and liquidise in batches. If the soup is too thick for your tastes, add more water.
Serve with crusty bread or any other bread you like eating with soup.
I also decided to harvest the final courgette.
 It still feels firm and produces a sound that sounds like it's firm on the insides when I tap it, so I think it's still good. I'm going to make curried marrow soup with it. I'm almost certainly going to adapt the recipe, partly as I have no idea what they mean by the instruction "cut the ends of the marrows", partly because I'm using an outsized courgette instead of a marrow and partly because I habitually adapt recipes to match the ingredients I have in the house.
Update: made the soup, it needed two saucepans to fit all the courgette in. It wasn't as nice (or as pretty) as my squash soup and I had to add extra curry powder for flavour (and also some olive oil for texture).
Update 2: both the courgette soup recipes on my blog in 2017 taste much better than curried marrow soup, especially this one, but also this one.


Here's the recipe (all amounts are approximate and can be varied), you will need a blender or similar device to blend this, although it's probably pretty nice even without blending:

Autumnal winter squash & ginger soup
Ingredients2-3 tbsp olive oil
1 bay leaf
2-3 tsp garlic, crushed or chopped (I used frozen)
2-3 tsp ginger, crushed or chopped (I used frozen)
1 tsp ground cumin
1/2 tsp nutmeg
1 tsp dried rosemary
2 medium onions, diced
2 large potatoes, cubed into c. 1 cm cubes (skin left on)
500 g carrots, sliced (skin left on)
1 medium and 1 small sweet dumpling winter squash, deseeded and roasted with the skin still on
1 vegetable stock cube
boiling water, enough to cover veg (probably about a pint)
Method:
0. Roast the squash in advance. See link. NB I roasted mine by halving them, scooping out the seeds, smearing them in olive oil and putting them on a baking tray on the bottom shelf of fan oven for an hour at 190 degrees while I was roasting some beef on the shelf above.
1. Heat oil in a large saucepan on a low heat and add bay leaf, garlic, ginger, cumin, nutmeg and rosemary.
2. Add the chopped onions and fry until soft, stirring occasionally.
3. While the onions are sauteeing, prepare (=wash and cube into 1 cm cubes) the potatoes. Add these as soon as the onions are nice and soft.
4. Keep stirring the veg in the pan occasionally and while doing this prepare (=wash and slice) then add the carrots.
5. Keep stirring the veg in the pan occasionally and while doing this separate the squash from its skin and add the flesh of the squash to the pan of veg. I recommend spooning/scraping the flesh of the squash out with a spoon.
6. Crumble in the stock cube into the pan, then add the boiling water to cover of the vegetables.
7. Bring to a simmer, put the lid on the pan, turn the heat down very low and leave on a low heat for 20 minutes.
8. Allow to cool until cool enough for your liquidising device, remove bay leaf and liquidise in batches. If the soup is too thick for your tastes, add more water.
Serve with crusty bread or any other bread you like eating with soup.
I also decided to harvest the final courgette.

Update: made the soup, it needed two saucepans to fit all the courgette in. It wasn't as nice (or as pretty) as my squash soup and I had to add extra curry powder for flavour (and also some olive oil for texture).
Update 2: both the courgette soup recipes on my blog in 2017 taste much better than curried marrow soup, especially this one, but also this one.

Sunday, 11 October 2015
Year 2: lessons learned
I learned a lot of lessons this year, some of which feel very much like year two lessons about running a full vegetable patch and some of which feel a lot more basic. One of my basic lessons (and yet one that I'm still not sure I'm right on) was about the tomatoes. I don't think I put them in a sunny enough spot, as they ripened late and I wasn't consistent enough with the fertiliser, which may or may not have been why they went dark brown and rotten before quite a lot of them ripened. I should definitely have tied them to their canes more effectively so they weren't lying all over the floor. Earlier picking would also have been good. The ones I allowed to ripen on the vine got eaten by slugs.
 A more appropriate year 2 lesson is that I discovered that celery matures really late, it's still not ready, so wasn't ready when any of my other salad veg was and no use as part of my summer salads. I'm not sure I'm going to bother with celery again, although I will be able to add it to the lunchtime soups I'm now moving onto to eat up my garden vegetables.
Also, I learnt that lettuce seedlings can only survive my gardens slugs if protected by cloches or copper rings (ideally squash-bottle cloches) and I should have planted them at more regular intervals.

I also screwed up the picking of the sweet corn. I picked it almost all too early or too late. Here's a picture of pretty much the only one I managed to pick at the right time (30 August for the record):

The problem was that because the very tip of it didn't look ripe to me, I thought it wasn't ready yet and left the rest of it longer. I now know better and have posted a post about when it is ready to pick here.
Another lesson: I am incapable of growing decent cauliflower, I won't bother again next year, I gave at least a passing shot at fertilising it, but clearly that wasn't enough. Jury's still out on the cabbage. I can grow it, but I didn't protect it enough from slugs and snails, and also, it's kind of a bitter, and I've noticed I have a distinct preference for the non-bitter, sweeter vegetables, like carrots. I might give red cabbage a go instead though, as that's not bitter, at least not after I've stewed it with apple.

Pea lesson: grow more mangetout and fewer/no peas. You get relatively few peas per plant and also they got infested with grubs, but the problem wasn't yet visible at the mangetout phase. Also, preparing mangetout is a lot less work than preparing peas and the relative costs of both at the supermarket mean growing mangetout saves you a fair bit of money, but peas are much cheaper from the freezer.

Final lesson for this post (very much a year 2, large vegetable patch lesson): I need to make a calendar of when things are due to be ready (like the runner beans) and plan my meals and holidays accordingly. I missed a lot of runner beans and peas because I didn't harvest them at the right time either because I was away on holiday or we were eating something they didn't go with. Kind of the same applies to the sweet corn, in part I left it on the plant for too long because we weren't eating anything it went well with.
When is sweet corn ready to harvest?

I found this tricky. I think I only got it right once (on 30 August) and at the time I thought I was getting it wrong. So, things to look out far are when the tufts go brown like this:


Also, you should pinch the ends like this while they're still on the plant:


Pumpkin patch


I now have a dilemma for next year: do I grow cucumbers again? I ate a lot of them, which made them a good crop for the garden (I've had a lot of things that didn't produce much and other things like chard that produced plenty, but which I didn't eat so much of), but cucumbers are more prone to powdery mildew than the other cucurbits, so they get it first then spread it to the other plants. I'm not sure whether to grow both again or to leave out the cucumbers. If I do grow cucumbers again, I need to check them much more regularly for signs of powdery mildew and remove all the affected leaves or perhaps even spray them with neem oil weekly as a preventive measure. My third alternative is to use a non-organic cure and my fourth is to let it go like this year, which certainly cuts down the prettiness, but doesn't seem to have harmed the squashes. My big problem with the neem oil is that it seems to mess up spray containers and I've had difficulty finding a container that's willing to keep spraying diluted neem oil.
Subscribe to:
Posts (Atom)