Tuesday 19 December 2017

Carrot, celery and fenugreek soup

I made this based on what I had in my fridge, my garden and my cupboards and it turned out lovely, so I thought I'd put in on my blog. This is vegan if made with a vegan stock cube. I think it would probably also be pretty good without liquidising.
2 tbsp olive oil
1 large onion
most of a pack of celery (I used 4 sticks for something else)
1 tsp ground fenugreek
8 large carrots
1 vegetable or chicken stock cube
salt and pepper to taste
boiling water

1. Put the olive oil in a large pan over a medium heat.
2. Peel and chop the onion (fairly fine), then add to the pan and stir.
3. Chop the celery, discarding any tough ends and any leaves.
4. Add the celery to the pan. Add the fenugreek to the pan. Stir.
5. Peel and chop the carrots. Add to the pan.
6. Add the stock cube and salt and pepper to taste. Stir, then add enough boiling water to just cover.
7. Simmer for 20 minutes.
8. Leave to cool until cool enough for your blender, then liquidise until smooth.
9. If necessary, reheat to serve.

Saturday 16 December 2017

How to make your own wooden compost bin (with design plans)

My other half made me a new compost bin for Christmas. Partly because he didn't like the look of the old one, partly because I'd already filled it to overflowing and needed more room. I know it's not Christmas yet, but he installed it early for me.
He made it from scratch based on some photos he found on the Internet with a few adaptations. Here's are his design plans:

You can click on the photos to see them in full size so you can see the numbers better. The lengths were largely based on the size of planks he bought.

Labour aside, it was actually pretty expensive to make because he used new landscaping timber. This has the advantage of being pressure treated, which means it should last longer. There seems to be some disagreement on the Internet about what forms of wood it is OK to make your compost bin out of. Untreated timber is definitely OK and cheaper, but might have a shorter life. Apparently old treated timber often used to contain arsenic, so should be avoided, as should any creosoted wood. We think it's OK to use modern pressure treated timber (and that's what we did), but different sources seem to disagree, partly due to the difficulty of ascertaining what the wood has been pressure treated with.
Here are some instruction on how he put the compost bin together with photos:


1. Measure the pieces of wood and mark with the correct lengths and cut angles.
2. Measure again (measure twice, cut once), then cut the pieces of wood to length making sure you cut the wood at the correct angles (some cuts need to be at 45 degrees). We used a mitre saw.
3. Screw each of the planks that make up the back of the compost bin to the piece of 2x4 that will connect it to the side. Make sure you space them correctly.
4. Screw the other side of each of the planks that make up the back of the compost bin to the piece of 2x4 that will connect it to the other side.

 5. Screw the piece of 2x4 that sits close to the front of the compost bin to the planks of wood that will make up the side. Make sure that you space the planks correctly and also leave enough wood in front of the 2x4 to be able to screw on the parallelograms of wood.
6. Do the same for the planks that will make up the other side.
7. Screw the triangle and parallelograms of wood that will hold the front slats to one of the sides (on the same side as the beam you screwed together - make sure they're the right way up).
8. Do the same to the other side.
9. Screw one side of the compost bin to the appropriate beam that you already used to screw the back together.
10. Do the same on the other side.
 
11. Move the compost bin into position, then add the slats. Do not screw them in, they're intentionally removable.

Ideally the other half would have liked to put another removable slat at the top, but he didn't order enough timber to include that. You'd also need another triangle of wood (like the one at the bottom) to hold the slat of wood in place.
We fitted our compost bin over the pile of compost I'd already made in the old plastic bin.
We removed the uncomposted material at the top first to make it easier to get the frame over it, then put it back in afterwards, plus I added some of the extra stuff I hadn't had room for before.

One of the things I like about my new wooden compost bin is it's easier to see how far the material at the bottom has composted. I'm hoping it should also be easier to get it out than it was from the old plastic bin.

The garden doesn't look its best at this time of year, but it looks a lot better with the new compost bin than it did with the old one, and more importantly, I now have room for more compost. I'll be freecycling the old compost bin later.

Monday 4 December 2017

Things it's worth knowing when buying your first greenhouse

I wasn't expecting to love my greenhouse as much as I do. I knew I wanted one, but I thought I wanted it for purely practical purposes. I wasn't expecting the joy it would bring.
The greenhouse came when we decided it was time to get a new shed, to replace the one that had practically fallen apart, so our greenhouse is part of a shed/greenhouse combination. This both saves space and is highly aesthetically pleasing - especially compared to the mishmash of non-matching shapes I was originally assuming I'd have to have if I bought shed and greenhouse separately.
Unlike many standalone greenhouses, instead of being built straight over the soil, this one is over a concrete base that came with the garden, so this one has a wood floor instead of opening straight onto the soil. This looks very pretty, but has an impractical side in that I tend to water the floor by accident when watering my plants. If it weren't for the existing concrete base, I'd have preferred one straight onto the soil. To deal with the wood floor, so far I've put trays and plastic sheeting under the shelves of plants (it's a shame I didn't measure before buying the first one, two of the longer ones would have been the perfect length).

I've also varnished the book cases I'm using as shelves for my plants with outdoor varnish, as these were starting to get water damaged. I intend to varnish the floor before I start putting plants in next year as well. If I'd known then what I know now, I'd probably have varnished the floor before I put any plants or shelves in at all (and then still bought the plastic trays). You can also buy purpose-made greenhouse shelving instead of using old book cases. Varnishing them took ages. On the other hand, because we already had them, they were free apart from the varnish. And they do look nice.

Another problem I discovered with the shed-greenhouse combo was that unlike a conventional greenhouse, there was little scope to cool the greenhouse down. It has no vents in the roof and only a small window that can be opened. I put a temperature data logger in to record the temperatures, and it already reached well over 40° by mid-May. What we did to solve this was to add a cabin hook, so the door can now be propped open without any risk of it blowing about in the wind and smashing the glass. I'm not sure if this is as effective as a ceiling vent, but it certainly helped.

The problem with leaving the and window open for ventilation though, is that it gives pests an opportunity to come in. This resulted in an infestation or two for us:
These are hell to deal with, especially if you're growing food, as there's so little you can spray at them. I initially kept the infestation down by crushing pests I saw between finger and thumb. I later discovered that taking all the plants out of the greenhouse and leaving them outdoors for a few days reduced the number of pests I had (this probably won't work for all pests in all climates).
I also need to completely empty and thoroughly clean the greenhouse before I put next year's plants in to remove any eggs that might have been left. I'm also thinking of buying a mesh screen door to keep insects out. I'm hoping that one you use for a house door will work, as that would be cheapest and most practical, plus I'll need an extra bit of mesh for the window. I don't know for certain if that will work, especially as my greenhouse is far from airtight around the corrugated roof, but I have hope and think it's worth a try. Edited: I tried, it was a bad idea. I kept the pollinating insects out with it, so had to hand pollinate, but the aphids still got in anyhow.
Another lesson I learnt is that tomatoes are incredibly thirsty plants, so although I grew each tomato plant in a pot that I'm pretty sure was bigger than a growbag, I still ended up watering them two or three times a day on hot days. In the end I decided to put them in large plastic crates. I haven't yet decided whether to drill holes in the bottom of the crates or rely on my ability not to over-water them. I think I'm going to try it without holes first, so I can return the crates to their original purpose later if I want.
Another lesson I learnt is that this sort of greenhouse is very pleasant for sitting in and reading, so it was well worth while leaving plenty of room for a chair and cushion. I got more joy from the chair than I think I could have done from extra plants - despite my love of plants.


And while we're talking about space, goodness do plants grow and need more room than you might think. I originally thought I was going to need another shelving unit for the end section where I grew the tomatoes. In reality, the tomatoes needed so much space an extra shelf would have been in the way.
Another lesson, that you can see partially implemented above is that plants look a lot nicer when they're all in uniform terracotta pots. I originally used what I had, which was fine in terms of housing the plants, but I was lucky enough to spot a really cheap offer for large terracotta pots at Wilko's. So next year I'll be using all the nice, matching terracotta pots I bought there for my plants' final pot. If they grow bigger than that, they'll just have to lump it, unless I find an offer for bigger pots.

Finally, I learnt that my most practical plants in terms of yield were the Cheyenne F1 chilli pepper and my Moneymaker tomatoes.

But the ones I loved the best were the purple ones.


Sunday 26 November 2017

Sugar-free pumpkin bread recipe

I made this bread with a very sweet type of pumpkin, so it was pretty sweet and pretty cake-like even though I didn't include any refined sugar. It's part way between a bread and a cake, and if you want to push it over the edge into very definitely cake, you can drizzle maple syrup over the top or you can add in some dried chopped dates.

Warning, this takes about 2 and a half hours, unless you roast the squash in advance, and even then it still takes about 90 minutes.
1 winter squash sweet dumpling (mine was 550 g whole)
125 ml extra-virgin olive oil + a bit extra for greasing
2 eggs
65 ml milk or water
½ teaspoon cinnamon
½ teaspoon ground ginger
½ teaspoon ground nutmeg
¼ teaspoon allspice
1 teaspoon bicarbonate of soda
1 teaspoon vanilla extract (or optionally essence)
½ teaspoon salt
220 g spelt flour
optional: 75 g chopped dried dates

1. Preheat oven to 180°C (without fan).
2. Cut the squash in half and scoop out the seeds with a spoon. Cut the squash into eight, then place on a baking tray and smear with olive oil.
3. Roast the squash in an oven for 45 minutes until soft, then remove and allow to cool, and turn the oven down to 165°C.
4. Grease a large loaf pan with olive oil and line down the centre with a strip of baking parchment.
5. Add the oil and eggs to a large bowl and whisk together until blended.
6. Add the milk, spices (cinnamon, ginger, nutmeg, allspice), bicarbonate of soda, vanilla and salt.
7. Scrape the pumpkin off the skin and add that too. Mix thoroughly.
8. Add in the spelt flour and stir gently until just combined. If you are adding chopped dried dates, add them now and stir in.
9. Pour the batter into your greased loaf pan.
10. Bake in the oven for about 55-60 minutes until you can insert a skewer or toothpick in the centre and it comes out clean.

11. Let the bread cool in the loaf pan for 10 minutes, then carefully transfer the bread to a wire rack to cool for 20 minutes before serving.

Thursday 2 November 2017

Squash, lentil and onion soup

Thelma Sanders squash
I finally harvested the rest of the squashes this year. It's not been a bad harvest this year. But it left me with a bit of a problem: what do I do with the Thelma Sanders squashes (the large yellow ones)? They're just not as sweet as the Sweet Dumpling squashes (or the delicious one I got given from Bulgaria), which means they need more jazzing up. Well, after wasting one in a bland tray bake, I was lucky enough to stumble across the answer: squash, lentil and onion soup. I made a variation of a recipe I found on the Internet. Here's my version:

300 g red lentils (dried)
1 large squash, cubed
2 medium yellow onions (or 1 very large one), diced
2 tablespoons olive oil
2 tablespoons fresh sage, minced (or 2 tsp dried)
1 vegetable stock cube (I use Kallo)
1 l boiling water
salt and pepper, to taste

1. Put the red lentils in a bowl and add cold water until covered (ideally starting about 20-30 minutes before you plan to start making the rest of the soup for best digestibility, but immediately before is OK). Leave to soak.
2. Peel the squash and remove the seeds.
3. Peel and chop the onions. Add the olive oil to a large saucepan on a low heat, then add the chopped onions. Cook for about 5 minutes, stirring occasionally until soft and a little brown. While the onion softens, continue with the next step of this recipe.
4. Chop the squash in to small chunks (ideally no more than 2 cm x 2 cm).

5. Add the squash to the onions in the pan and stir.
6. Chop the sage. Add it to the pan and stir.
7. Drain the lentils in a sieve and add to the pan.
8. Add the stock cube and the boiling water. You might not be able to fit all 1000 ml into your pan. If you can't, about 750 ml is enough for now.
I filled my pan too full. I should have left some of the liquid out to prevent spills.
9. Add salt and pepper to taste and sir thoroughly.
10. Bring to the boil, cover, reduce the heat to low and simmer for about 30 minutes until the squash is tender and the lentils are soft.

11. Leave the soup until it is cool enough not to damage your liquidiser (add some cold water if there is room in the pan), then liquidise (in batches if necessary). You may need to add more water at this stage depending on how liquid you like your soup. I added around 250 ml more water, but even more water would also have worked. If you don't have a liquidiser or if you would like a stronger texture you can mash the soup with a potato masher or even just a fork instead.

Wednesday 25 October 2017

Warming roasted squash and pepper soup recipe

This is about as simple as soup recipes get and it's utterly delicious - or at least it is if you use a nice, sweet squash to make it with. The squash is responsible for the majority of the flavour. I made this one with a squash someone I know brought me that grows in her home country of Bulgaria. I've no idea what the squash is called, but wow, it was deliciously sweet and I'll be growing more next year from the seeds. Cross your fingers for me that it'll grow equally well in the UK.
The soup would also work well with my winter squash sweet dumpling (the pretty squashes behind the bowl of soup in the photo above), or any other squash with a sweet flavour. You can make this recipe vegan/vegetarian by using vegetable stock instead of chicken stock.
Cheyenne pepper
Warming roasted squash and pepper soup recipe

2-3 large winter squash sweet dumplings or 1 large butternut squash (ideally a sweet variety)
2 small yellow peppers
2 small red peppers
1/4 chilli pepper - or however much chilli gets your preferred level of heat - I used a cheyenne F1 chilli pepper*, so used 1/2 of it because these are less hot than other chilli peppers
2 tbsp olive oil
1 1/2 pints chicken or vegetable stock (optionally made with boiling water and a stock cube)
5 tsp smoked paprika
Salt to taste

1. Preheat the oven to 180° (fan).
2. Peel the squash if it's the sort of squash that can be peeled raw. Remove the seeds and chop it into large chunks or wedges and put on a baking tray.
3. Remove the seeds and stem from the bell peppers and cut each pepper into 4, then place on the baking tray.
4. Remove the seeds and stalk from the chilli pepper, cut down to the amount required, and place it on the baking tray.
5. Pour over the olive oil and toss the peppers and squash in it to make sure they are all coated.
6. Put the tray of squash and peppers in the oven and bake for 45 minutes.
7. Allow to cool until cool enough to touch. Then, if you weren't able to remove the squash's skin when it was raw, remove it now by scraping the flesh out with a spoon. Put the roasted squash (without skin) and peppers (including the chilli pepper) in a liquidiser. Add the stock, smoked paprika and salt to taste (you may have to do this in 2 batches, in which case put half of each of the ingredients in each). Liquidise until smooth.
8. If necessary (e.g. you used cold stock), heat the soup through in a microwave or in a pan before eating.

* I grew my cheyenne peppers in the greenhouse from small plants I bought at a local garden centre. They have a relatively mild level of heat (30,000-50,000 Scoville heat units) and I highly recommend them. They were attractive, compact plants (about 30 cm x 30 cm), grew a huge amount of fruit and were fairly simple to care for.

Sunday 22 October 2017

How to collect and save seeds from vegetables


There are two key reasons why I haven't tidied up the garden:
1. I'm lazy, and
2. I've left it all to go to seed so I can gather the seeds.
If anyone asks, I'm pleading the second.
I have been hard at work gathering seeds this year, as there are quite a few vegetables you can do this from.
  • Rocket
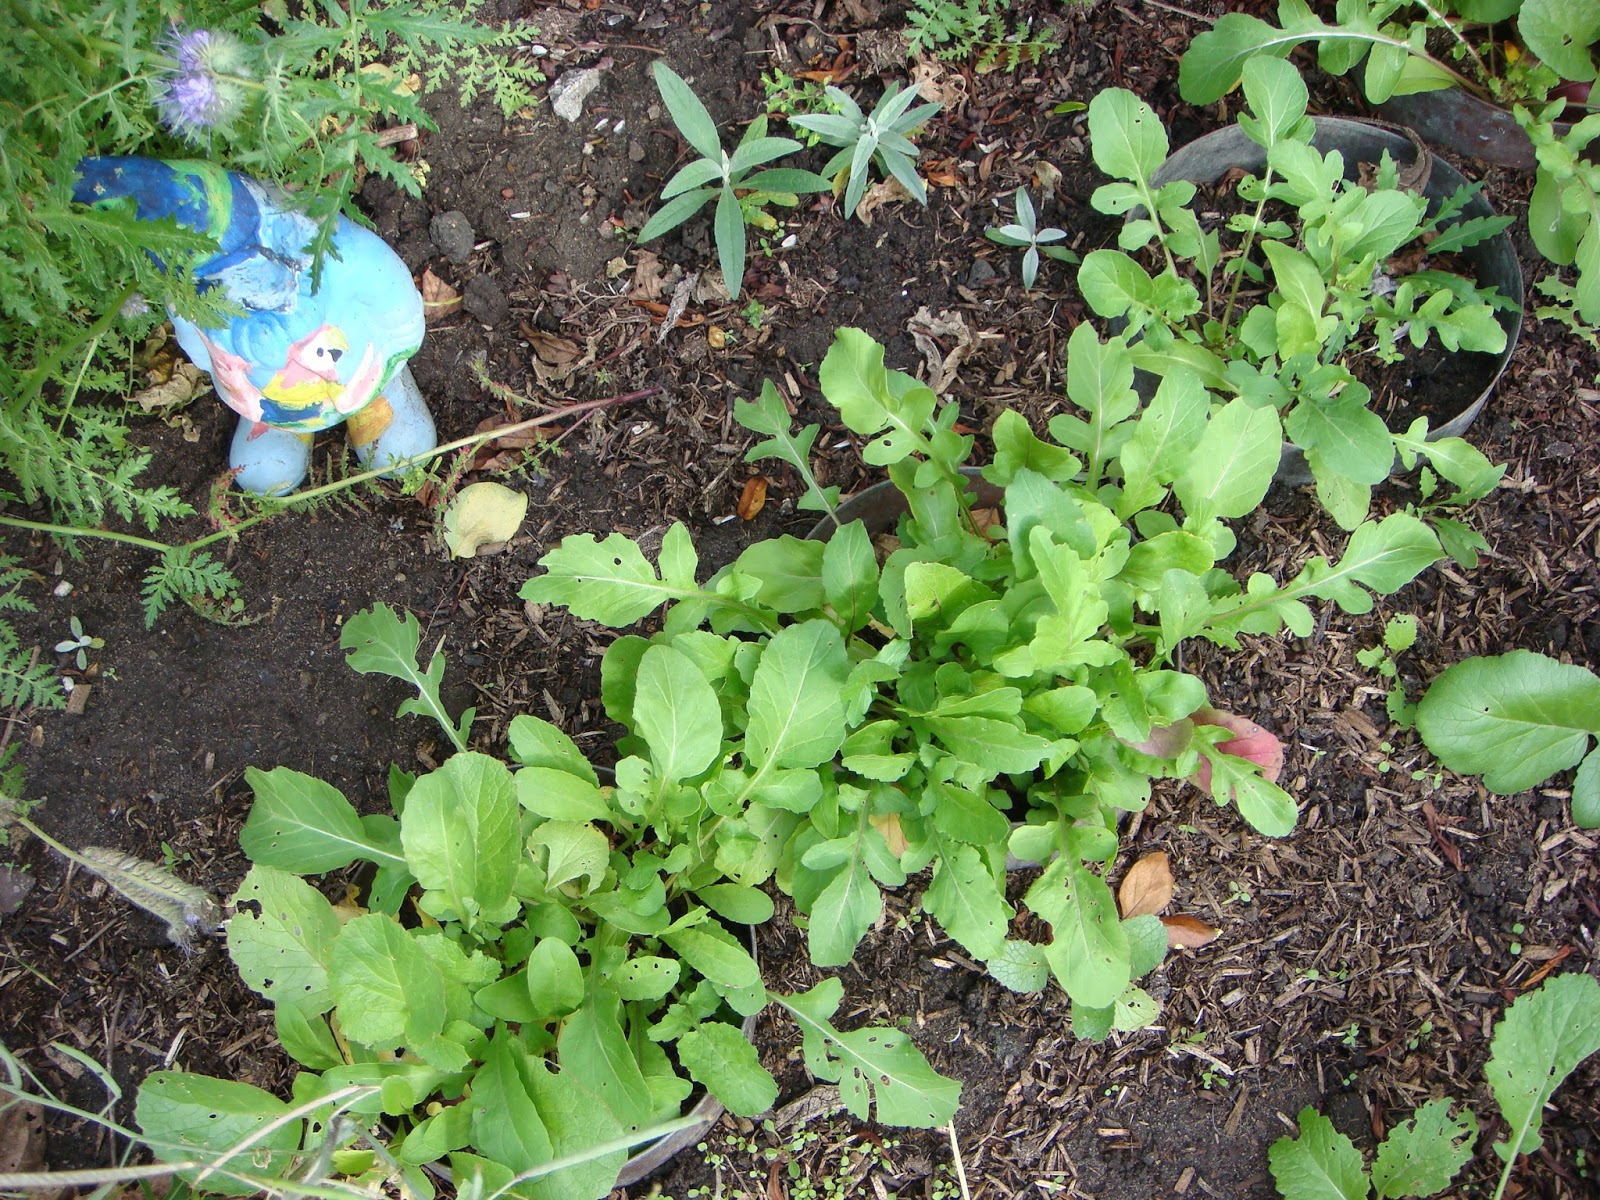
The picture below is rocket after it's gone to seed.

It has lots of individual pods full of tiny little seeds. To collect the seeds, wait until it looks dried out like the pictures, then rub the individual seed pods between your finger and thumb over an open envelope, or anything else you want to gather the seeds in. The seeds, which are tiny little brown dots, will fall out of seed pods into your container.
My experience says you'll need a lot of the seeds - I have great difficulty getting rocket seedlings past the things that want to eat them, so sowing in large numbers is probably going to help. I think the main culprits may be birds from the fact that the self seeded rocket seems to have grown in large quantities under the protection of the dried-out stalks and seed pods above.
The other way I've been quite successful with it is to grow it in with radishes so it's not so easily noticed by whatever it is that likes to eat my seedlings right down to nothing. I still ended up with far more radishes than rocket.
  • Carrots and parsley
Carrots and parsley are both members of the apiaceae family and both are biennials, meaning they flower and produce seeds in their second year. This means that in order to gather seeds from them you have to leave them growing in the same spot for two years, which kind of messes up your crop rotation system. I did that with the parsley because I had it in the herb garden, which isn't part of my crop rotation. With my carrots, one of my plants got so stressed it flowered in its first year, so I got lucky there, but usually I wouldn't get a chance to gather carrot seeds. I think if I wanted to grow carrot seeds intentionally, I might plant them somewhere completely outside my crop rotation beds.

Carrots look like the pictures above when they flower. Parsley looks pretty similar, only the variety I grew was more a yellowish green colour than a white.
You can gather the seeds once the flowers have gone brown and dried out and you can see the seeds. Just knock them off the plant with your finger into an open envelope or other container.
  • Beans
With beans, you wait until the pods have dried out.


Then you simply leave them in their pods, or to take up less room in storage, take them out of their pods and put them in an envelope.
I'm still waiting for these beans to dry out some more. They look dry in the photo, but they still look full of moisture in real life.
  • Peas and Mangetout
The peas work just like the beans: you wait until the pods have dried out and then you leave them in the pods or take them out and store them in an envelope. I didn't manage to store any mangetout this year because by the time I'd finished eating mangetout the plant had died and there were none left to save as seeds. But I did have plenty of sweet peas left over, and the principle's exactly the same:
  • Aubergine (eggplant), tomatoes, bell peppers (capsicum), chillies
These have their seeds on the inside of a fruit. There's no waiting for these to dry out. Most will rot first if you try to dry the whole fruit. In fact, I think that's how so many of my tomatoes have self seeded all over the garden - the fruit has fallen off the plant and rotted into the ground, where its seeds have germinated. What you have to do is cut into them when they are fully ripe. Most tomatoes, peppers (except green peppers) and chillies are fully ripe when you eat them - the riper (usually = redder) they are the better.


Aubergines are usually eaten before their seeds are ready.
The almost black one at the back was far too young to have any seeds. The lighter purple one at the front was getting there and had a few large seeds in.
But it wasn't until the aubergines had a thoroughly yellowy brown tone to the skin that they had a lot of seeds of a decent size.

When I opened the aubergine, the seeds were in the centre and I dug the whole section out.
You then need to remove seeds from this and wash off as much of the pulp they're stuck to as you can with water. I sometimes do this by putting them in a sieve and running water over them. I then rub them and pull out the largest bits of pulp. The same applies to all these types of seeds - the types of pulp in the different plants largely vary in how juicy and how sticky they are.
I like to get as much of the pulp off as possible, but actually you only need to get enough off so you can dry the seeds with any remaining pulp out without the whole thing rotting.
I then dry out the seeds I've washed on a plate or in a ramekin. Sometimes you end up having to prise them off the plate afterwards, even when you think you've got all of the pulp off.

Once they're dry you can put them in an envelope to save them.
  • Squashes, pumpkins, courgettes (zucchini) and cucumbers
The seeds of squashes and pumpkins are gathered when they're ripe enough to eat.

With courgettes, if you eat them at the size they sell them in the shops, you won't get any viable seeds, but they definitely produce seeds by the time they get to the size of a marrow and they can produce seeds before that stage, while they're still perfectly edible. Before they're huge, only the bigger seeds will be viable. From the size below you may get some viable seeds.

From this size you definitely will:
With cucumbers, they need to be riper than you'd buy them from the supermarket. You can still eat the flesh around the seeds when they're big enough to produce viable seeds. The photo below is probably a big enough cucumber to produce some viable seeds, but basically the bigger the better, as the more mature the seeds will be:
Only leave cucumbers to mature with the intention of producing seeds at the end of the season (or by accident) though. Once a plant gets close to maturing seeds it will focus all its energy on that and stop producing new fruit.
With all of these plants, you collect the seeds by scooping the pulp and seeds from the centre of the mature fruit:

Like with the tomatoes, aubergines etc. you then scrape/pull the seeds out of the pulp and rinse them off as well as possible. Then leave them to dry on a plate. I recommend not leaving them to dry on kitchen roll, as otherwise you end up with little bits of kitchen roll stuck to them forever. I also recommend not drying them off straight on a kitchen work surface because you may damage the surface when you have to prise them off because the traces of the pulp and juice stuck them to it.

  • Lettuce

I haven't yet managed to save seeds from my lettuce.
To my surprise the flowers grew like dandelion flowers and then even followed through into the fluffy dandelion clock stage. I saw them like that and foolishly thought "I'll leave them a couple of days to get a bit riper". But then it rained and all the fluff and seeds washed away (probably self-seeding all over my garden). So my current advice is, as soon as your lettuce flowers move into the fluffy dandelion clock stage, pull the fluff out and save it and the seeds (or if easily separable, just the seeds) in an envelope.
  • Sunflowers
I know these aren't technically a vegetable, but I grew them in the vegetable garden, so I thought I'd add them in as a bonus.
Sunflower seeds are ready when they look like this. You can usually just push them out with your thumb.

  • Storing your seeds

I tend to collect and store all my seeds in envelopes because the paper creates good conditions for them. Little money envelopes like this are excellent for saving space.
Label them with the most precise description of the plant you have and the year. This one is labelled "Sweet peas 2017 (white, pink, purple)" because I didn't know the full name. Where possible I record the full name on the envelope (e.g. aubergine "Black Beauty"). Occasionally I also record other data, like how far apart to plant them, if I think I'm going to have difficulty finding it again. The year is on there so you can work out which seeds you collected most recently.
I like to seal my envelopes by folding over the top twice, then fastening it with a paperclip. I do that because in the past when I just folded the envelope without a paperclip (or even when I sealed it with its gum), I ended up with a lot of seeds getting loose. Then I had to chuck them or guess what they were.