Saturday, 12 August 2017

Slightly problematically sugar-free beetroot, raspberry and chocolate cake

These raspberries are not ripe yet. I picked all the ripe ones for my cake.
I was in two minds whether to include this recipe, because it's somewhat problematic. The problem is that I made it free from added sugar, because I try to avoid added sugar, and when you eat it like that, the cake is weirdly moreish, but also an intense-cocoa-powder experience that is probably too much for most people and made me think I shouldn't make this cake again, despite its perfect moist texture and weird moreishness (it really is weird, I spent my whole time eating it thinking I wasn't keen on the flavour, but I really wanted some more).
My other half has no such qualms about sugar, so I covered his slice in maple syrup, and he said it was restaurant-quality food and I had to put the recipe on the blog (and he is not a man afraid to say when he thinks my cooking experiments haven't worked out).
I suspect the correct answer is to include sugar or your favourite sugar substitute in it while baking it. I'm not entirely sure how much. Based on the recipe I adapted this from, my guess would be 250 g of caster sugar, but I haven't tried this, so can't be certain it doesn't change the recipe, for instance changing the delicious moist texture my other half loved so much. I was hoping the raspberries and beetroot would together be sweet enough to make the cake palatable, but even in my world of thinking most things are sweeter than everyone else because I barely eat sugar, I found this bitter. Interestingly, my other half didn't find his single mouthful of un-syruped cake bitter, so whether you find such highly chocolatey but unsweetened cakes bitter may depend on your genes. It's quite possible I'm something of a supertaster.
A lot of the quantities in this recipe are based on how much I happened to have easily available from the garden (the raspberries were all my ripe raspberries). Generally people say you're not supposed to mess with baking recipes, as they can go horribly wrong, but I've often found that if I change the amount or type of fruit in them, I mainly end up having to adapt the baking time and don't ruin anything critical.
Anyhow, here's the recipe, feel free to run your own experiments from it:
Slightly problematically sugar-free beetroot, raspberry and chocolate cake

275 g cooked beetroot (chop into 4 pieces and boil for 30 mins to cook if not buying pre-cooked)
3 medium eggs
200 ml mild olive oil (the sort they recommend for general cooking, when you don't want too much olive flavour - you could use other oils instead)
1 tsp vanilla extract
150 g cocoa powder
200 g plain flour
2 tsp baking powder
optionally: 250 g of caster sugar (untested, impact on texture and bake time unknown)
245 g raspberries
You will need a liquidiser or food processor to make this like I did.

1. Preheat your oven to 180°C/160°C fan/gas mark 4. Grease 2 sandwich tins with oil or butter. Line them with baking parchment if they don't have removable bases (I simply cut a c. 20 cm wide strip of baking parchment that was long enough to stick out each end and put it across the middle of the tin - it's the lazy way to line sandwich tins, but doesn't give such perfect results as cutting the paper to fit perfectly).
2. Put your (cooled) boiled beetroot and the oil in your liquidiser or food processor and then crack in the eggs and add in the vanilla. Liquidise/food process them until you have a smooth pink liquid To do this without a food processor, grate the beetroot and then stir/whisk the aforementioned ingredients by hand (this will change the finished texture).
3. Sift the cocoa powder, flour, and baking powder together into a large bowl. (If you were going to add sugar, now would be the time.) Mix the dry ingredients, then make a well in their centre.
4. Pour the pink liquid into the well in the dry ingredients.
5. Mix together. I used a spatula and the resulting mixture was quite dry.
6. Roughly chop the raspberries.
7. Add these to the cake mixture and stir well. This will make the mixture much wetter and will largely break up the raspberries and leave the raspberries distributed within the mixture to different degrees, so you run into occasional pockets of intense raspberry in the finished cake.
8. Divide the mixture between your two sandwich tins and smooth down with a spoon or spatula so that the surface is level.
9. Bake in the oven for around 25 minutes. If you insert a skewer into the cake it should come out clean when the cake's done. Also, when the cake's done, if you push its surface down a little, it should rise back up when you let go.
10. Turn out to cool on a cake rack.
11. You now have options about how to serve it. 
I served individual slices from a single sandwich layer, like a fancy chocolate torte from a restaurant. 
If you have no issues about eating sugar or similar substances and you didn't already add sugar, I recommend drizzling maple syrup all over it. This solves all of the problems about it not being sweet enough, but completely takes away the point of not adding sugar. 
Alternatively, you could serve it with single or double cream.
Or you could put the two layers one on top of the other with raspberry jam or Philadelphia-style soft cream cheese or Mascarpone or whipped cream (optionally with raspberries) or icing* (for instance chocolate icing, raspberry icing** or icing for red velvet cake) in between and optionally with more icing or cream over the top or over the rest of the cake.
Doing something along the lines of a black forest gateau, but with raspberries instead of cherries might work well.
All of these suggestions except the maple syrup and serving it plain are untested, but they feel like good flavour matches to me.
*Icing is called frosting in US English.
** Confectioner's sugar is US English for icing sugar and you can convert cups to grams here or you can use a measuring jug. One US cup is 236.6 ml.

Saturday, 5 August 2017

Storms fell giant sunflower

When life gives you lemons, make lemonade. It wasn't my plan to use my sunflowers as cut flowers, but when the storms the other day knocked one over completely, the choice was in a vase or in the compost heap.

It knocked over or broke quite a bit of the sweet corn too. I tried to stabilise the sunflower while the storms were going on, but I only made it worse, and it tipped over and ripped itself out by the roots. I've now pinned up the sweet corn with bamboo canes, and am simply having to live with the fact that although my row of sunflowers looks less impressive, sunflowers do make great cut flowers, so the garden's loss is the kitchen's gain.

The tomato experiment - greenhouse v. outdoors - part 2 - the findings


The tomatoes in the greenhouse grew much bigger much quicker than the tomatoes outside. The tomatoes outside have reached about 50 inches, the ones in the greenhouse around 70.

But interestingly, the Moneymaker plants both inside and outside the greenhouse produced ripe tomatoes on roughly the same day.
I wasn't paying enough attention to be absolutely certain which came first. I think it was probably the ones in the greenhouse, but it was definitely close. However, both the greenhouse ones and the outdoor Moneymaker tomatoes were pipped to the post by my miniature Gardener's Delight tomatoes growing outdoors, which ripened a few days earlier.
What I've really learned from this is that nothing I did with the greenhouse produced me tomatoes any earlier, but the plants are bigger and currently have more fruit on them. They're also more work because I often have to water the tomatoes in the greenhouse 2 or 3 times a day when it's hot. And I have less space available in the greenhouse, so I can produce a similar number of tomatoes outdoors simply by growing more plants.
Nevertheless, I like having tomatoes in the greenhouse, as the first year I ever tried to grow tomatoes, it rained and rained and rained and was cloudy and cold, and my tomatoes all got blight (or something long those lines) and never gave me a single tomato. Growing a couple in the greenhouse is likely to provide a hedge against that, as they are protected from both cold and rain in there. On the other hand, they're huge plants, so I don't want to grow too many of them in the greenhouse, especially not if they're perfectly happy to grow outside. I might try and see if I can grow a greenhouse-only tomato next year for more variety. Currently I'm most enjoying my greenhouse for things it's hard or impossible to grow outside in the UK. That's plants like bell and chilli peppers and aubergines.


Saturday, 29 July 2017

How to make a wildlife barrel pond

 
On Gardeners' World on 2 June 2017, 19 minutes into the show Nick Bailey showed us how to make a wildlife pond out of a barrel.
I've long wanted a pond, so we followed his steps, more or less, to make our own. Here are the steps (and approximate costs):
 1. Buy a half barrel that is water tight. We bought a red wine half barrel with a diameter of 73 cm for £54.99 from eBay/Celtic Timber. You need to make sure it's watertight before you buy it. Some are sold as planters with holes already drilled in the bottom and some may not be waterproof for other reasons.
2. Work out where you want to put it. You don't need to sink it into the ground, although it may not be as useful for wildlife if you don't. Nick Bailey recommended putting the pond in partial shade and near a route through between your garden and neighbouring wilder areas that wasn't blocked by a solid fence. I live in a suburban area and my garden is entirely surrounded by solid fence, so I made a choice based on aesthetics and where we had partial shade (=3-6 hours of sun a day). If you have a couple of options, it can help to physically move the barrel there and see how it looks.
3. Once, you've worked out where you're going to put it, if you've decided to sink it in the ground, dig a hole slightly bigger than the barrel.
4. Put the barrel in the hole to make sure the hole is the right size. The barrel rim should be a couple of centimetres higher than the surrounding earth to stop lots of earth falling into the pond. Once we had dug the correct size, we then took the barrel out again and stamped the earth down to try and make it more level. We then put some gravel in the hole to help with levelling (and to get rid of some spare gravel we had left over from another project). This is optional.
5. Use a spirit level to check if the barrel is completely level. If it isn't, keep working on it until you have it level.
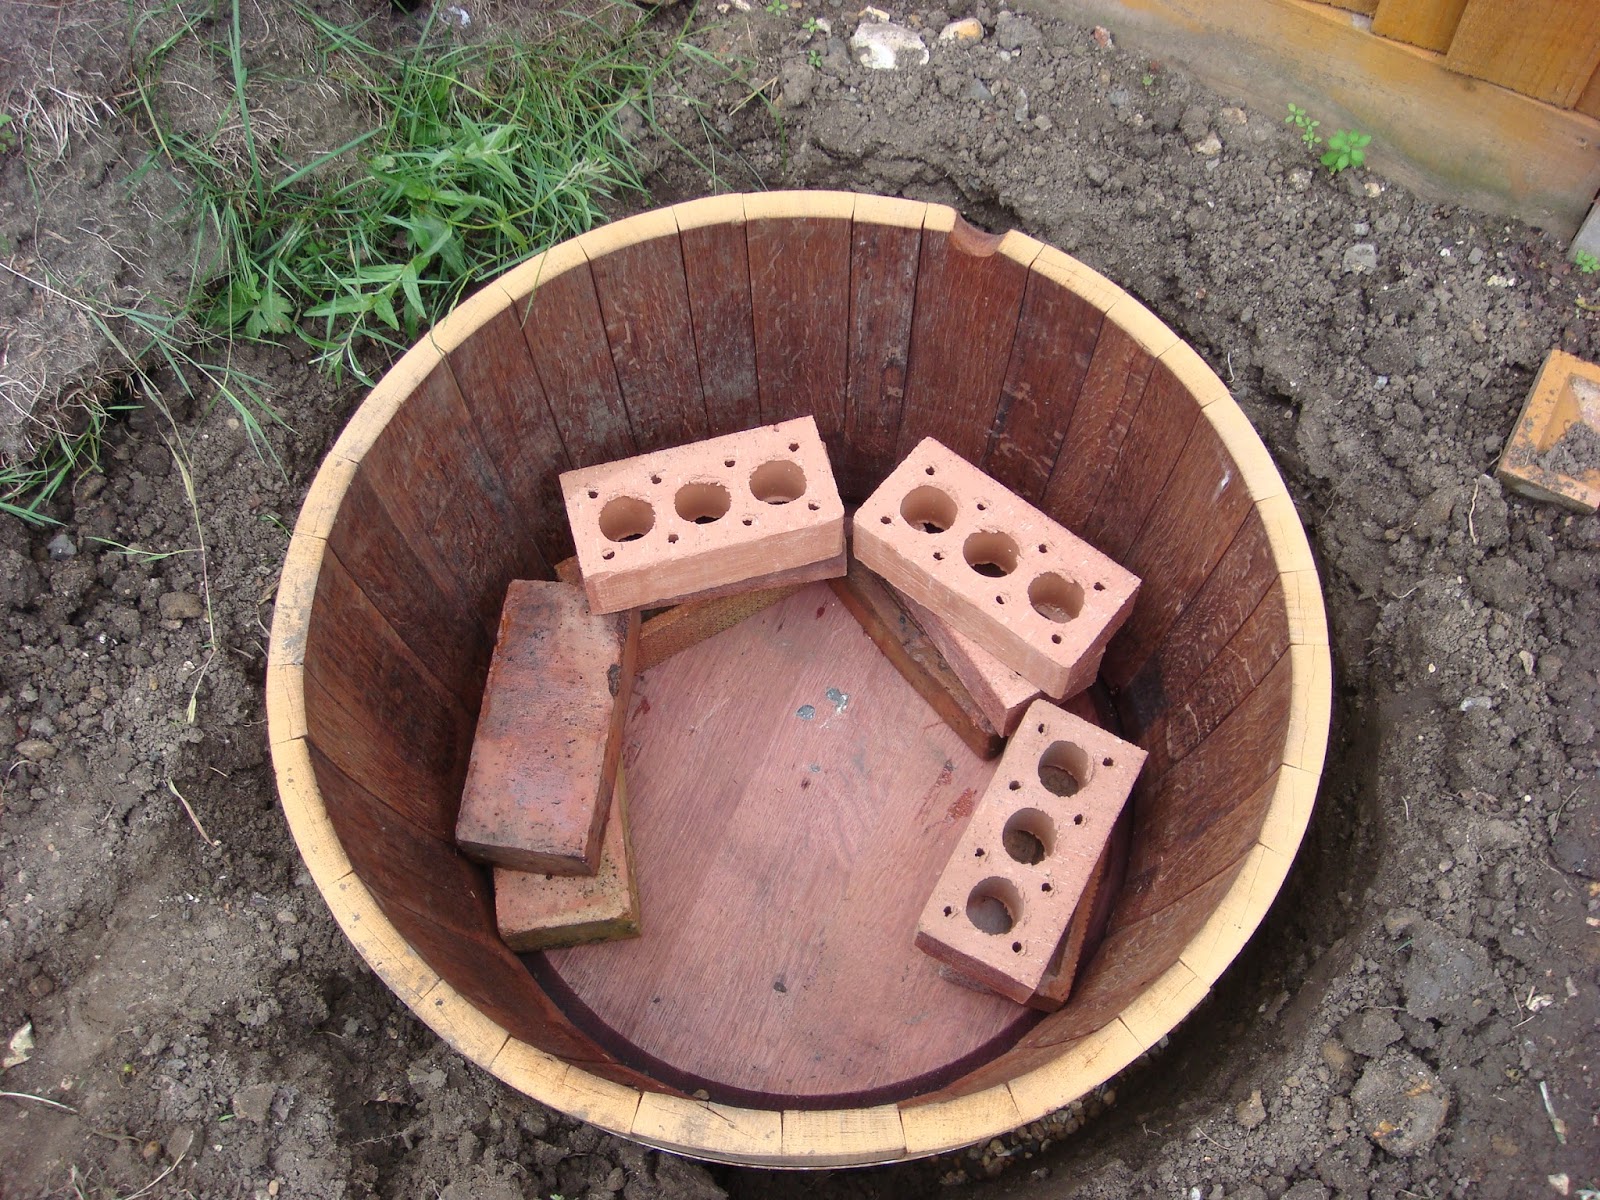
6. Buy or find some bricks. Ones with holes in them are good. We used 10 and ours cost 74 p each from B&Q, but around half of them were already lying around the garden. We gave them a good rinse before we put them in the pond, as we didn't want to add unnecessary soil or brick dust.
7. Place the bricks round the edges of the pond to create shelves of different heights to put your pond plants on. Our shelves are a mixture of two and three bricks deep. This is a good time to experiment with where the bricks go, as they will dictate where your plants go.
8. Make sure you have water available to go in your pond. Ideally this should be rainwater from a water butt. According to Nick Bailey, if you have to use tap water, allow it to stand for a few days first to allow it to neutralise. He didn't say, but I'm guessing you can leave it to stand in the barrel and just put your plants in after a few days. Don't use water from other ponds, as this could transfer disease to your pond.


8. Buy pond plants (aquatic plants) for the pond and place on the bricks. Make sure that the plants suit your pond conditions. I made sure all my plants were able to tolerate partial shade (they really need to be able to, that pond gets a maximum of 3 hours of sun a day). I also made sure they were suitable for small or medium ponds. I'm possibly pushing my luck a bit with plants suitable for medium ponds. Time will tell. Finally, I also made sure they were all suitable for planting depth zone 2 or 3. Based on the labels, planting depth zone 2 means the higher level of bricks in my pond and zone 3 means my lower level of bricks.
If you buy the plants already potted up in aquatic baskets (plastic plant pot-style baskets with holes in the sides), then you can just put the plants straight in the pond. If you buy them without the aquatic baskets, then you will need to pot them up yourself. Here's some information about that.
I picked a range of plants based partly on the ones Nick Bailey chose, partly on the fact that I wanted them all to have white flowers (I didn't quite succeed) and partly on the fact that another website recommended that I should include an oxgenator and partly based on what was available at my local garden centre. The plants were 3 for £12 or £5 each, so I spent £24.
My plants were:

  • Slender club rush 'Scirpus cernuus' - my oxygenator
  • Water plantain 'Alisma plantago' - the one I noticed too late wasn't quite white
  • White water spearmint 'Preslia cervina alba'
  • Iris (snow queen) - probably. It was a label stuck over the original label. When it grows it may turn out to be the blue bog iris, iris sibirica.
  • Barred horsetail 'Equisetum Japonicum' x 2

The plants Nick Bailey mentioned in the show for in the pond were:
  • Iris versicolour 'Blue flag'
  • Rough horsetail - Equisetum hyemale'
  • Pendulous sage - Carex pendula (this is a transitional plant that you can plant either inside or outside the pond)
  • Water spearmint - Mentha cervina
  • Nymphaea 'Solifatare' (minature waterlily)
The plants he mentioned for around the pond were:

  • Ligularia dentata 'Dark beauty' (leopard plant)
  • Dryopteris filix-mas (male fern)

Here's a link to another website which suggests further alternatives to Nick Bailey's choices and also names some of the plants he planted, but didn't name on camera.

I really want a miniature waterlily for my pond, but all of them say they need full sun, including the one Nick Bailey used. What's probably going to happen is that I'll see how the other plants get on and leave the decision till next year. Anyhow, on with the instructions.
9. Pour in the water. Mine took around 15 7-litre watering cans full, i.e. around 105 litres less splashes etc.


10. Add some pond dye in order to prevent algae from growing and taking over your pond. Stir. We chose black because it mainly just makes it look like our pond is just much deeper than it is. Nick Bailey said you hardly need to use any of it. The show showed him adding about 1/6 of a teaspoon. The dye I bought from Amazon (£14.95) said I should use a 5 ml scoop per 40 litres. Torn between what it said to do on the pack (2.5 scoops for 100 litres) and Nick Bailey's suggestion that you hardly need any, I put 2 scoops in. In retrospect, I think that was too much and the pond is darker than necessary. Next time (in about 3 months according to the pack), I'll try using much less. The pack I bought came with gloves (to stop it staining your hands, it's non-toxic) and a 5 ml scoop.
11. Fill in the soil around the pond. Nick Bailey said to soak the barrel to expand it and make it waterproof before using it. We figured that soaking it was very similar to filling it, so we decided to simply keep an eye on it for whether we needed to top it up and leave it a week before filling the soil in, in case it makes a difference. We're not sure how much difference it made. It stopped noticeably seeping water from the sides during that time, but after I added the dye, this seeped into the barrel too and the staining pattern changed every time it rained. Also, it barely lost any water even when you could see small amounts seeping out the side.
11. Add some plants around the pond.

12. If your pond is a bit higher out of the ground than mine, add some stones by the rim to act as a bridge for wildlife getting into the pond.

My original plan was to plant the surrounding area up with carex pendula and ferns and other similar plants like Nick Bailey did. However, at this point I realised a) that I'd already spent nearly £100 on the pond (which made me feel a bit guilty) and b) that ferns and similar plants were not cheap (and I had no guarantee that they weren't going to prove unsuitable for the area and die).
Obviously, in an area that only gets 3 hours of sun a day (between about 8.45 and 11.45 a.m.), I need plants that tolerate shade well. Even though it's been raining a lot recently and the pond is completely full and has almost certainly overflowed, it doesn't seem to get wet to the point of marshiness there. So what I decided to do was to transplant some shade-loving British native plants there that I was already growing seedlings of. It now has a mixture of foxgloves and honesty seedlings growing round the edge. Both are partial-shade-tolerant biennials and should flower next year, if they survive transplantation. I'm certain the honesty will survive, I've transplanted that before. It's a matter of wait and see with the foxgloves. I will also be open to letting anything attractive that seeds itself there stay there.

Currently, I'd still like to add some ferns, but I'm also open to seeing what develops.

Here's a view of the garden from above so you can see how the pond fits into it. Clue: It's on the far right more or less opposite the greenhouse door, just in front of the apple tree, behind a pile of earth that I will be gradually spreading over the rest of the garden or otherwise removing.
Edited: You also need to add a way for wildlife to get into and out of the pond, for instance a plank of wood in the pond that provides a gentle slope for any creatures to crawl out of. Also, it's well worth checking which ponds plants can withstand frost and what you need to do over winter with any that can't. Most of my pond plants died in the first winter.

Sunday, 23 July 2017

Dealing with spider mites in the greenhouse

Fairly early in the season, my greenhouse got infected with little red pests that I believe to be red spider mites.

I suspect the invasion arrived either when I bought some pepper seedlings from a local garden centre or when I started to leave the door and window open to stop the greenhouse from getting too hot. That's not important. What's important is that despite my best efforts at crushing the pests to death between finger and thumb, the problem has increased in size along with the growth in plants in my greenhouse.

I read around a bit on the topic and came to the conclusion that these things are persistent and difficult to deal with. Organic suggestions for killing them included crushing them (which I did), spraying them with water because they don't like being damp (which I did), blasting them with water (which I did outdoors on the worst affected plants using a hose), using neem oil (which I didn't) and clearing the greenhouse out very thoroughly with disinfectant after you've removed all the plants and all organic material at the end of the season (which we haven't got to yet).
I do actually own some neem oil. My problem with it is that every time I mix it with water (and washing up liquid to help it mix), it quickly destroys the spray bottle I put it in until all the bottle is capable of producing is a single fine line of spray in response to considerable pumping. It's done it often enough that I don't currently dare put it in my new spray bottles, making me owning the neem oil a little bit pointless. Maybe I'll be braver next year.
Anyway, what I can tell you is that although I believe my spraying with water and crushing and occasional blast with a hose to have kept the pest level lower than it would otherwise have been, it hasn't stopped it growing. The most effective thing I've done I actually did by accident: I transferred some of the plants there was no longer room for in the greenhouse outside and planted them in the front garden. They no longer have any sign of spider mites on them. This got me to thinking: what if I move all the plants in the greenhouse outside? So I did.


I took all the plants in the greenhouse (except the tomatoes, which were too huge for me to brave moving and seemed unaffected by mites) out of the greenhouse and lined them up along the path. The weather was so warm that I had no concerns at all that it would be to cool for them outside. My original plan was to leave them out there for a week. Unfortunately high winds and thunder storms got in the way, so I had to move them back inside after only a few days. At this point they were still infested with mites, but the infestation was much smaller than it had been originally.
I think what is probably happening is that mites are delicious, but things that find them delicious only live outside the greenhouse. And possibly also that these mites are a lot less keen on weather in the UK than greenhouse climates. When I moved them outside, I saw insects flocking to them, especially ladybirds.

I suspect that mite infestation is going to be a regular event for me in the greenhouse and that my regular solutions are going to involve crushing the mites by hand and moving the plants outside when it's sunny for other insects to feast on them. It should be noted that the strategy of moving the plants outside is not without risks. The plants are quite capable of picking up new types of infestation while out there - for instance green fly. And it was also possible that my infestation would simply spread to other plants in the garden. However, neither of these things appeared to have happened with my front garden peppers, so I decided to brave it and have been rewarded by a significant drop in my infestation level. Warning: this solution worked in the UK. It is possible that it is specific to something about the UK environment. If spider mites are a common problem outside of greenhouses in your country (or if the weather outdoors in your country would kill greenhouse plants), then this is unlikely to be of any help to you and may even worsen the problem.